
Table of Contents
In this article, we will learn How To Install macOS High Sierra On VirtualBox On Windows using VMDK.
Apple has announced another version of its Mac operating system, “macOS High Sierra.” Obviously, the actual shift is that, following fifteen years in this industry, Apple has ditched the “OS X” tag. All things old are new again, and the new operating system will only predict “macOS.” So, I am not likely to talk about Apple’s new launch, “macOS High Sierra” rather; I will help you Install MacOS High Sierra On VirtualBox On Windows.
If you want to try with ISO file, you can read this: How To Install macOS High Sierra on VirtualBox on Windows PC (Using ISO): 5 Easy Steps and How to install macOS High Sierra on unsupported Mac? 11 Easy Steps with Patch file.
NOTE: You can also find our installation video at the end of this post.
System Requirements to Install MacOS High Sierra On VirtualBox On Windows
Before we begin, be sure you read the following prerequisites. Please don’t bypass this step since it will enable you to install MacOS High Sierra On VirtualBox On Windows successfully.
Requirements
Minimum 2 GB memory (Recommended 8GB or more significant)
Minimum 2 cores of CPU (Recommended 4 cores or greater )
Hard disk free space 20 GB (Recommended 100GB or Greater )
Your machine should encourage Intel or AMD VT (Virtualization Technology)
Intel/AMD VT (Virtualization Technology) Must be allowed out of BIOS installation.
Required: If you have not enabled it already, you should enable Virtualization Technology (aka Intel VT or even AMD-V). Here is a video tutorial that can help.
Moreover, it’s highly suggested that you set up macOS High Sierra on SSD (Solid State Drive) rather than HDD (Hard Disk Drive) since You’ll Have a much quicker performance with SSD Instead of HDD.
In the following guide, I will show you How To Install MacOS High Sierra On VirtualBox On Windows PC. You can also check out our video tutorial at the end of this post.
I am sure the process isn’t easy and works for everyone. You might face these common errors when installing MacOS X On VirtualBox On Windows- Here is a complete guide to help you fix those errors. Complete Guide To Fix VirtualBox Errors While Installing Mac OS X
Tested On LOW CONFIGURATION DESKTOP On 2nd October 2021
Installing macOS on VirtualBox on a Windows PC isn’t technically legal under Apple’s terms of usage, but we use it for educational and testing purposes. If anybody misuses it, then that is not our duty.
How To Install macOS High Sierra On VirtualBox On Windows
MacOS High Sierra 10.12.06 has attracted more intriguing attributes that are much amazing. Here are some features of MacOS High Sierra:
- You can talk to Siri.
- Universal “copy-paste”
- You can unlock your Mac with Apple Watch
- You can rearrange everything in the status bar
- More Messaging Features
- Finding photos made easy
- Share notes on iCloud
- You can use Apple Pay online
- Optimizing Mac Local Storage
- Transfer your entire computer to iCloud
- Picture-in-picture function
- Adding annotations to your pictures
- Tabs instead of separate windows in desktop applications
Hint: Before reading the guide (How to Install macOS High Sierra On VirtualBox On Windows), it is suggested to browse to the download section of the post, and you will have time to browse the post before downloading has finished.
How To Install MacOS High Sierra On VirtualBox On Windows
- Download macOS High Sierra VMDK by Techrechard.com (Mediafire)
- Install VirtualBox onto Windows PC
- Install & Update VirtualBox Extension
- Create a New Virtual Machine & Customize it
- Run VirtualBox Code via Command Prompt
- Start your Virtual Machine
- Perform a Clean Installation of macOS High Sierra
How to install macOS High Sierra on unsupported Mac? 11 Easy Steps with Patch file
NOTE:
Before implementing How To Install macOS High Sierra On VirtualBox On Windows, ensure your system has Virtualization Technology (VT) enabled. Also, it’s powered by BIOS, so you ought to be able to conduct Virtualization Technology such as Virtualbox or VMware. You should also have a 64-bit Windows operating system using 2 GB RAM and 20 GB of free storage. We urge one 4 GB of RAM or more and higher space, so it’s possible to save more files and set up more macOS High Sierra disk drive programs.
If you want to try with ISO file, you can read this: How To Install macOS High Sierra on VirtualBox on Windows PC (Using ISO): 5 Easy Steps
Download The Required Files To Install MacOS High Sierra On VirtualBox On Windows
All the needed documents are linked to the article below. Also, you ought to be able to download them with no difficulties.
- Download macOS High Sierra VMDK by Techrechard.com
If you get bandwidth error- How to Download MEGA files without Limits: 16 Easy Steps in 2021 - VirtualBox Code by Techrechard.com
- Virtualbox 6.1.10 Installation (Direct Link)
- Download Virtualbox Extension
How to install macOS High Sierra on unsupported Mac? 11 Easy Steps with Patch file
If you get a Quota exceeded error, you can use the Mediafire links provided. If you want to use Google Drive links only, check this- Fix Google Drive Download Limit (Quota Exceeded) Error.
DISCLAIMER: The macOS High Sierra VMDK is created only for testing & educational purposes. We are not responsible if anyone is misusing the macOS High Sierra VMDK.
1: Download MacOS High Sierra VMDK
You have to get macOS High Sierra VMDK in the link supplied. We will use the VMDK file of the macOS High Sierra inside this guide. Please see the manual step-by-step. If you miss any step, you might face several errors while installing. So, read all the steps carefully because all of these are significant.
The VMDK file is around 9.58 GB, so you will need a good internet connection to download MacOS High Sierra VMDK file. So, here is a tool that you can use to speed up the download process. Internet Download Manager tool that will help you enhance your downloading speed. You can download the full version here.
- IDM 6.27 Build 2 Registered (32bit + 64bit Patch) [Techrechard.com] – This file is password-protected, and the password is www.techrechard.com. You can extract this file using WinRAR download free and support: WinRAR (win-rar.com).
Recommendation: It is highly suggested to make a brand new drive in your own Windows PC and put in macOS High Sierra onto another drive.
2: Install VirtualBox On Windows PC
In the “Important Files” part of the article, you ought to have downloaded VirtualBox. In case you did not, download VirtualBox’s latest version and install it directly in your Windows program. If you have installed VirtualBox, then you may bypass this step. Aside from that, follow the steps below.
You can read the complete guide here: How to Install Virtualbox on Windows: 3 Easy Steps
3: Install & Update VirtualBox Extension
Go to the Virtualbox download page. Beneath VirtualBox 6.1.10 Oracle VM VirtualBox Extension Package segment, click All supported platforms to download Virtualbox Extension Package.

As soon as you’ve downloaded the Extension package. Now, follow the steps below to upgrade the Virtualbox expansion package.
Open VirtualBox, and navigate into Programs > Pereferences> Extensions.

Click the Plus (+) icon and choose the VirtualBox extension you’ve downloaded at the segment’s start. Just click Install or Update, after which Agree into the Stipulations. Click on the OK button.

Last, it would help if you saw something similar to the screenshot below.

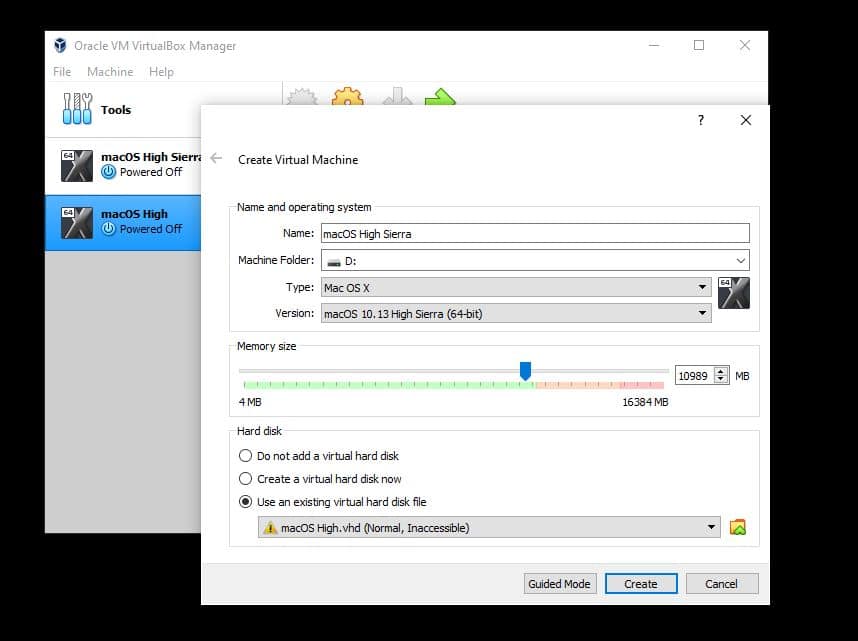
4: Create A New Virtual Machine & Customize It.
Follow the steps below to make a new virtual server for macOS High Sierra using the VMDK file.
1. Open your VirtualBox program and click on New.

2. Click on Expert Mode, then Pick the following options and CREATE.
- Add an Acceptable Virtual Machine Title.
- Virtual Machine Location (leave it default or choose a fresh drive).
- Type (Mac OS X).
- Model (Mac OS X 64-bit).
- Memory 4 GB (advocated 8 GB or greater ).
- Hard Disk: Select Use an existing virtual machine hard disk file. Click on the Folder icon to browse the macOS High Sierra VMDK file.
- Click Create
3. It is time to edit the virtual system to create its functions. Select macOS High Sierra VM and Click Settings. Now, bring the following changes into macOS High Sierra VM.
: 8 Step Ultimate Guide 3")
Beneath System>Motherboard, raise the Base Memory into >8000MB. But, you may use a little memory in case your system does not possess this RAM.
Uncheck Floppy in the Boot Order section.
Below the Processor tab, raise the processor to 4 or greater.
Change Boot Order and Eliminate Floppy Disk
: 8 Step Ultimate Guide 4")
In the Display window, raise the Video Memory to 128MB.
: 8 Step Ultimate Guide 5")
5: Run VirtualBox Code Via Command Prompt
Once you’ve customized and created your virtual server, it is time to conduct some codes to set up macOS High Sierra on VirtualBox.
To begin with, you need to notice your virtual machine name in the future. We’ll utilize it. Open the VirtualBox code you should have downloaded in the necessary File part of the article. If you have not downloaded does not matter. Use the following code.
Notice: Before you implement the code command prompt. You need to EXIT THE VIRTUALBOX.
Download VirtualBox Code by Techrechard.com
Once you opened the VirtualBox code through notepad or some other text editor, use this app’s substitute function to Replace the “VM Name” with your virtual machine name. See the image below to understand the best way to take action.
: 8 Step Ultimate Guide 6")
You have two options.
First, if you want to fix your macOS High Sierra screen resolution in the first place. You should also execute the following code. You must change “VM Name” with your virtual machine name and HxV with a screen resolution such as “1280×720“.
VBoxManage setextradata "VM Name" VBoxInternal2/EfiGraphicsResolution HxVImportant Note: We highly recommend quitting the VirtualBox program before executing the code. If you don’t do it, your virtual machine might not proceed to the installation step.
: 8 Step Ultimate Guide 7")
After you substituted the “VM Title ” together with your digital machine name, run the code by one through the command prompt (CMD). It’s possible to start the command prompt by pressing on the Windows+X crucial in Windows 10 and choosing Control Prompt in the listing. Or push the Windows key and type CMD. Click on Run As Administrator and click on Yes.
: 8 Step Ultimate Guide 8")
6: Start The Virtual Machine
Beginning macOS High Sierra using the old version of this Mac operating system was somewhat different. However, using fresh macOS High Sierra nevertheless, it’s simple to set this up.
Open the VirtualBox program, then click on the Start button again. A black screen with a couple of white text will show up on the monitor.
: 8 Step Ultimate Guide 9")
: 8 Step Ultimate Guide 10")
I am sure the process isn’t easy and works for everyone. You might face these common errors when installing MacOS X On VirtualBox On Windows- Here is a complete guide to help you fix those errors. Complete Guide To Fix VirtualBox Errors While Installing Mac OS X
7: Perform A Clean Installation Of MacOS High Sierra
When You’ve passed step 6, you will observe the macOS High Sierra window. Pick the following choices. Changing most future settings is possible, so don’t be concerned about it for the time being.
- Select your own Country and click on Continue.
- Select a Keyboard Design and click on Continue. If you are unhappy with the default settings, then it is possible to personalize the Preferences.
- About the ”Data & Privacy” window, then click on Continue.
- Select- Do not transfer any info now.
- Don’t set up Siri for today. Skip it.
- Click Setup Afterwards, Do Not Sign-In. It’s possible to add your own Apple ID later.
- Click on Agree to the Requirements and Conditions and click on Continue.
- Fill in the Full title, Account name, Password, and Tip, then click Continue.
- If you would like to personalize Express Setup, it is possible to click Customize Settings and click Proceed.
- About the Analytics window, then click on Continue.
How to share folders on VirtualBox & Vmware? (Windows-MAC) Step by Step Guide
8. Update macOS High Sierra to the Latest Version (Optional)
You should do this step if your macOS High Sierra is not updated (not required). So you can update it by following the instructions below.
Click on the Apple logo at the top-left corner of your screen. Select App Store.
: 8 Step Ultimate Guide 11")
On the App Store window, you’ll see Software Updates are available. Click Check Now/Show Updates.
Just click Update All. Click Download & Restart.
Wait for a couple of minutes so that the update should be installed. It might take 5-15 minutes to download all updates. However, it depends on your internet speed.
: 8 Step Ultimate Guide 12")
Once the update is downloaded, your system will restart automatically. Again wait for 15-20 minutes for the update installation.
How to share folders on VirtualBox & Vmware? (Windows-MAC) Step by Step Guide
Repair Common Errors
The problem is seeing “[EB|#LOG:EXITBS: START] (AND present DATE/TIME).” Use the control below.
VBoxManage modifyvm “VM Title” --cpu-profile “Intel Xeon X5482 3.20GHz”— is a double dash
Please note that your issue might be different depending on your location. Please share your error in the comment section below; we will try fixing it.
I am sure the process isn’t easy and works for everyone. You might face these common errors when installing macOS X On VirtualBox On Windows- Here is a complete guide to help you fix those errors. Complete Guide To Fix VirtualBox Errors While Installing Mac OS X
Overview: How To Install MacOS High Sierra On VirtualBox On Windows
Fundamentally, in the following guide (How to Install macOS High Sierra On VirtualBox On Windows), I have shown you the step-by-step guide on how to Install macOS High Sierra On VirtualBox On Windows.
We’re all set to keep getting your comments about this guide and other articles on techrechard. Your ideas and opinions are highly valued.
If you want to try with ISO file, you can read this: How To Install macOS High Sierra on VirtualBox on Windows PC (Using ISO): 5 Easy Steps


20 Comments
The only working file available on internet.
Thanks Ruby!
Cheers Josh!
Thanks! The file worked!
Thank you!
Thank you so much. It works!!!
Great! Stay tuned!
When I try and run the .iso in VirtualBox, it ends up just repeating a command line sequence (shown in image) and after a while will restart the virtual machine.
Did you run the Virtual Machine commands in CMD correctly?
Also, try appending this command at the end-
VBoxManage modifyvm “YOUR MACHINE” –CPU-profile “Intel Xeon X5482 3.20GHz”
I’m still fairly new to working with virtual machines, how exactly do I do that?
Can you try following this video?
https://youtu.be/nMbKadbJigM
Okay, I reread the instructions and was able to boot the machine, but now when I go to sign into my iCloud the machine restarts. Any ideas?
Skip it on the installation part. When the installation is complete. Sign-in to your cloud later.
Thanks for the tutorial, it worked, but how to access my PC files in virtual macOS? I selected a whole partition as shared but still macOS in virtualbox won’t see any file
Simply open your VirtualBox and go to settings. You can then see the Shared Folder option on the left and add your folder or drive directly.
Here is a detailed guide I have prepared esp. for you-
https://techrechard.com/how-to-share-folders-on-virtualbox-vmware-windows-mac/
hello every one excuse my english.
I have this problem
unexpected session: 100000 uid: -1 requested by:36
appleKeyStore: operation failed (pid:36 sel:7 ret:e00002c2 ‘-536870206’ -1, 100000)
Loop
Slds
CODE_SIGNING: cs_invalid_page ({some_value_of_what_looks_like a memory block address}) and then ends with TOO MANY CORPSES BEING CREATED got a ton of those
and then at the end stuck at
AppleIntelCPUPowerManagement – timed out
Did you check if you alloted enough RAM.?
I just did this today and got everything to boot up but when I open the appstore is blank and shows loading in upper right corner continuously. Any ideas?
Did you try restarting the machine?