

Table of Contents
In this article, we will learn How To Install macOS 13 Ventura on VirtualBox. We have provided all the links to download the macOS Ventura ISO file for Virtualbox, VBox codes, and official Virtualbox.
If you are on a MAC, you can use this guide: How to Install macOS Ventura in a Virtual Machine on an M1 or M2 Mac with UTM
The new macOS update, macOS Ventura, is the latest release from Apple that brings several new features to the table. You can read our in-depth macOS Ventura Review and explore features you might not know.
It is a significant update for the operating system and has been in beta for some time. It brings features like Dark Mode, allowing users to switch between light and dark interfaces depending on their preference. It also includes a new Stacks feature that organizes files by type in an easy-to-navigate interface.
Ventura also includes improvements to Safari, as well as tweaks to Mail and Photos apps.
Lastly, it introduces a new way of organizing your desktop with the addition of stacks.
So, I’m sure most of you are eager to try and test the latest operating system from Apple, macOS Ventura. For people will MAC systems, you can simply download macOS Ventura DMG file and directly install it on your system. For Windows users, this guide will help you install macOS 13 Ventura on VirtualBox on your Windows PC.
Things Required to Install macOS 13 Ventura on VirtualBox on Windows PC.
- Enable virtualization of your Windows 11 PC. Here is a guide you can use: How to Enable Virtualization in Windows 11? Easy Guide
- Download and Install Virtualbox on your Window PC: Use this guide: Download Oracle VM VirtualBox & Install on Windows
- Download macOS Ventura ISO File
Step-by-Step Guide
[UPDATED: 21st March 2023]
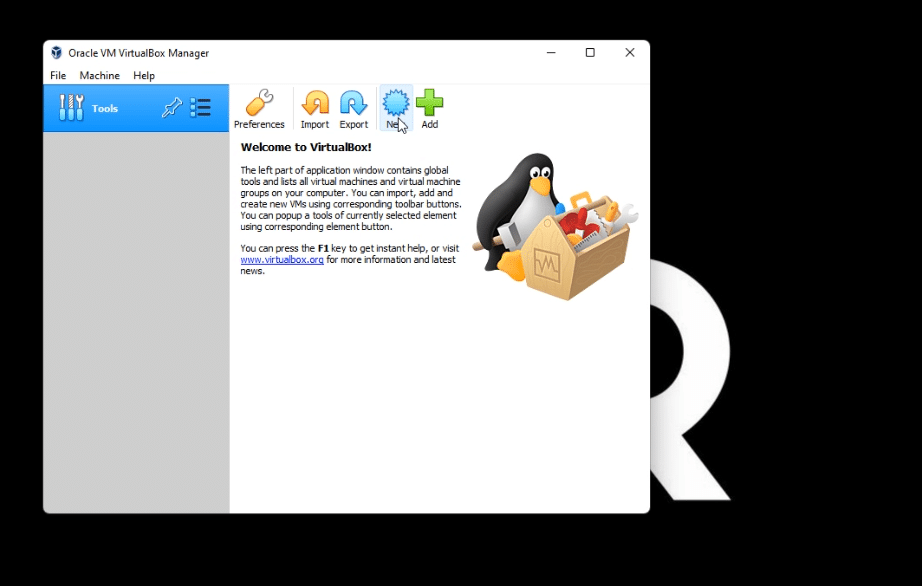
1. Once you have completed the above-mentioned steps. Open your Virtualbox and click New.
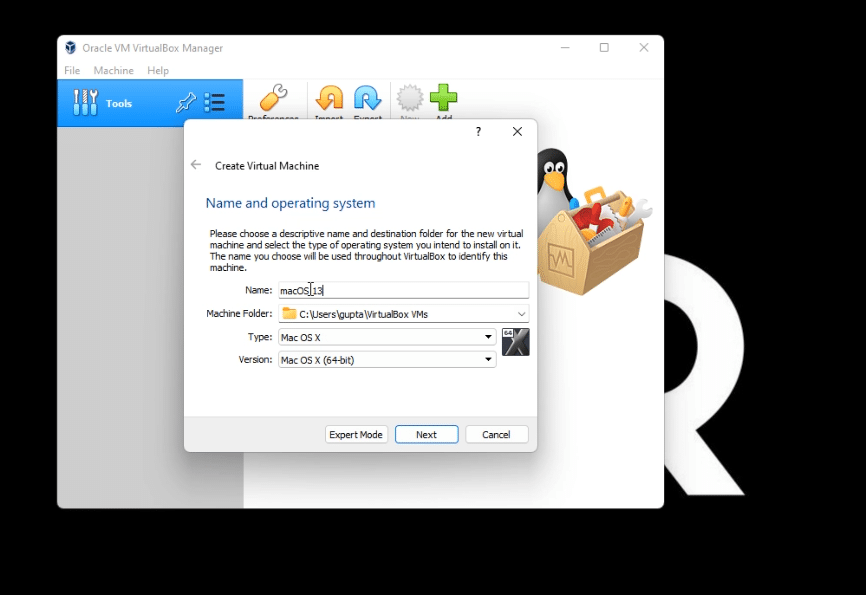
2. Enter the name of your Virtual Machine (In our case: macOS 13) and click Next. Make sure you follow the screenshots below.
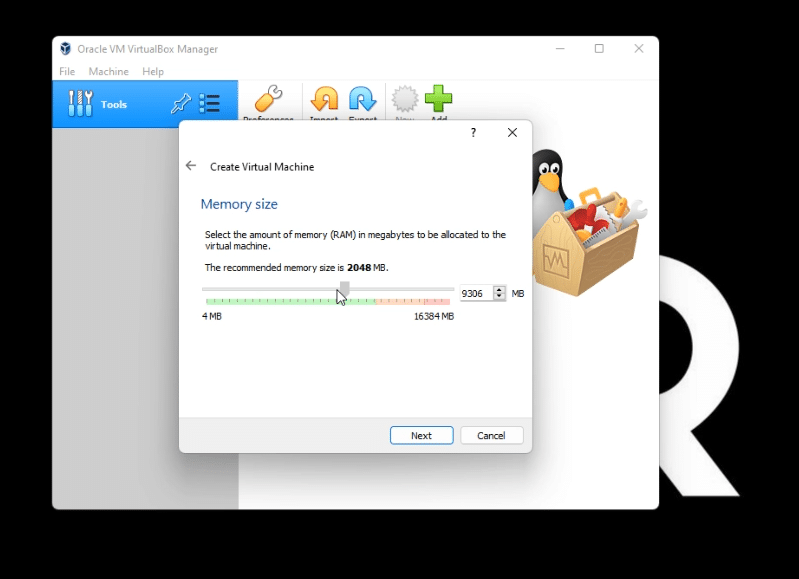
3. Increase your memory size to the upper green limit and click Next.
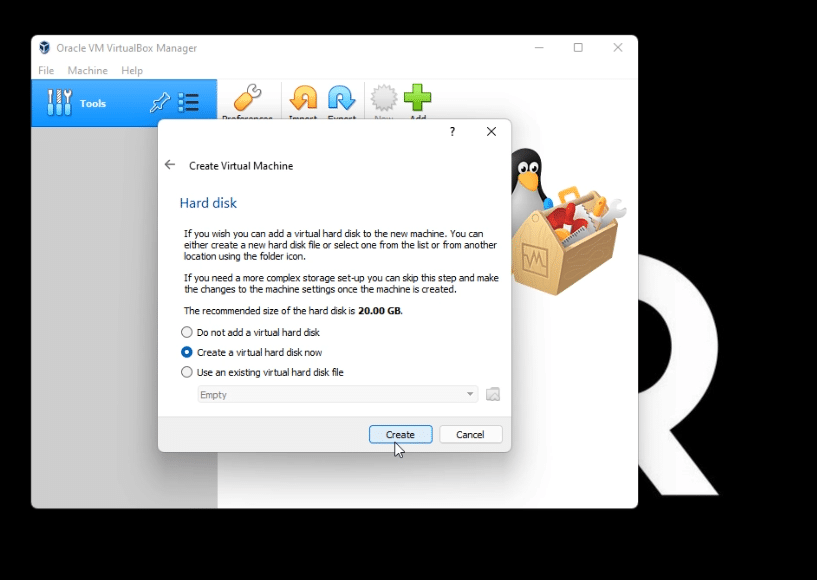
4. Select Create a virtual hard disk now and click Create.
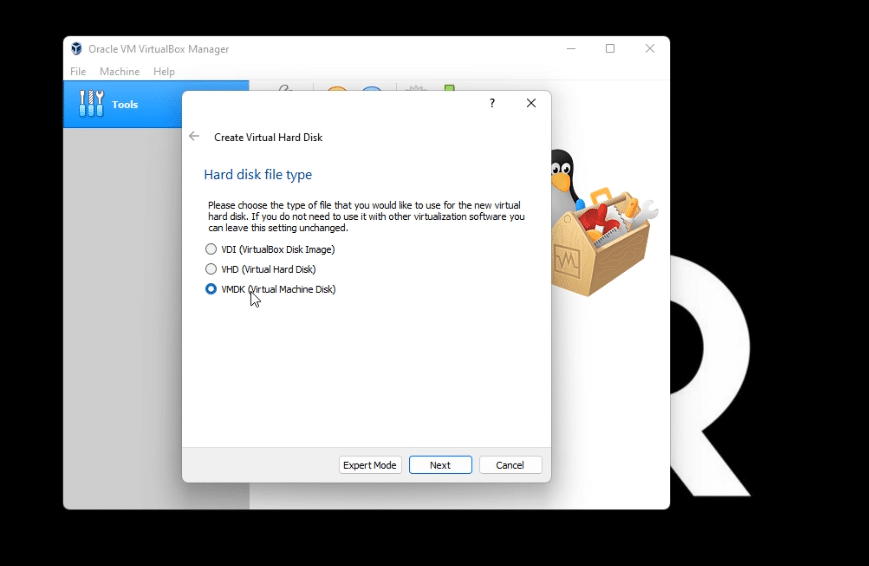
5. Select VMDK (Virtual Machine Disk) and click Next.
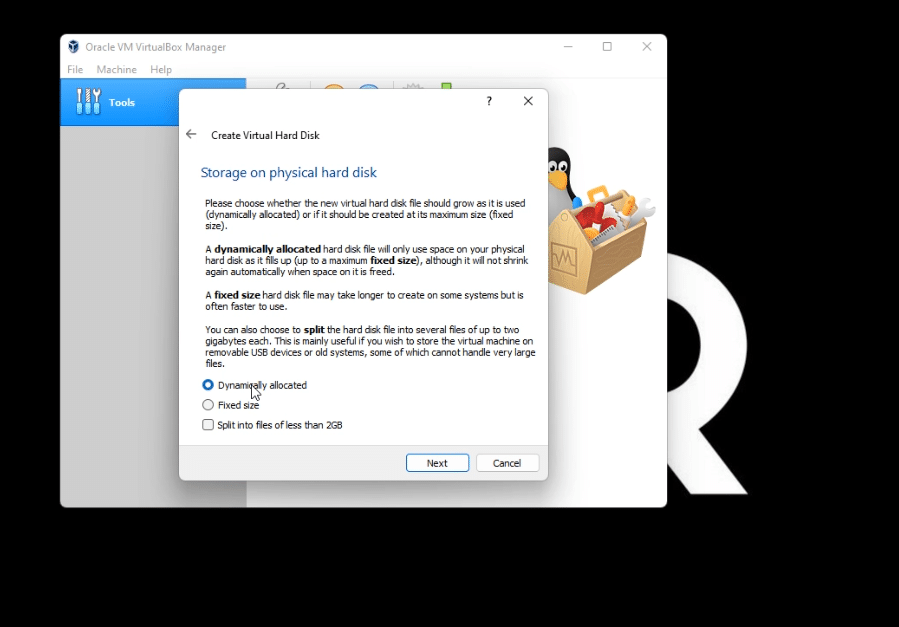
6. Select Dynamically allocated and click Next.
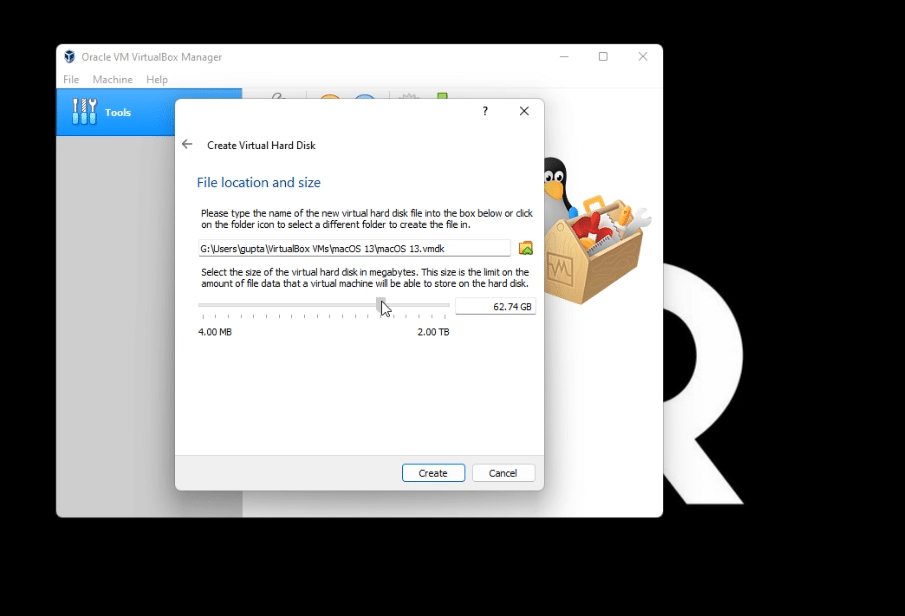
7. Select a size to anything near 80GB and click Create.
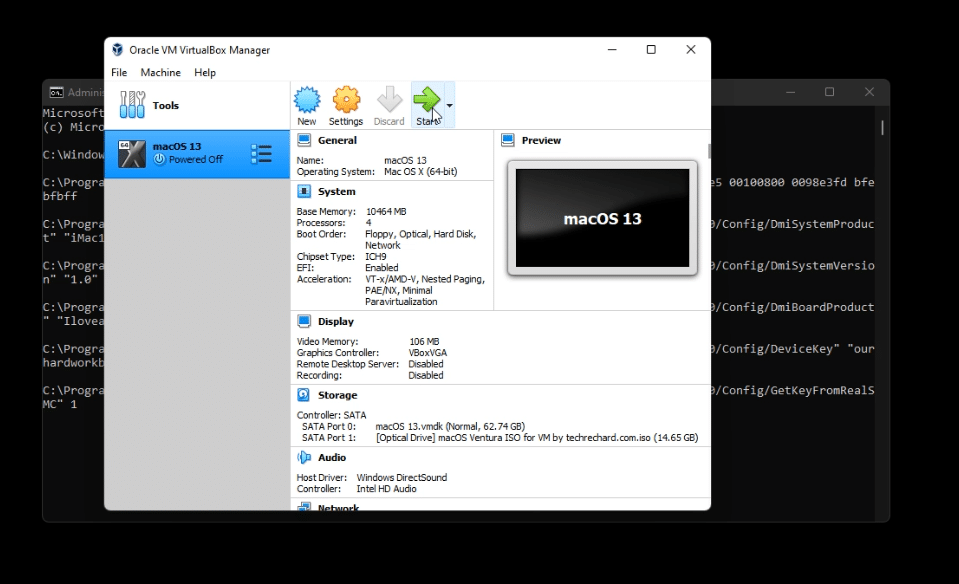
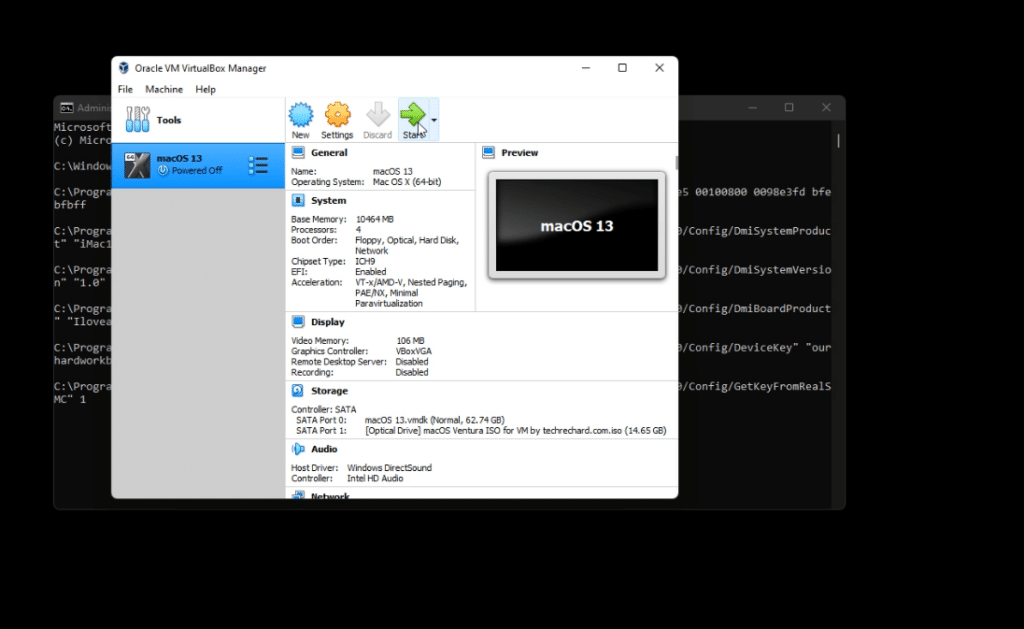
8. Click Settings.
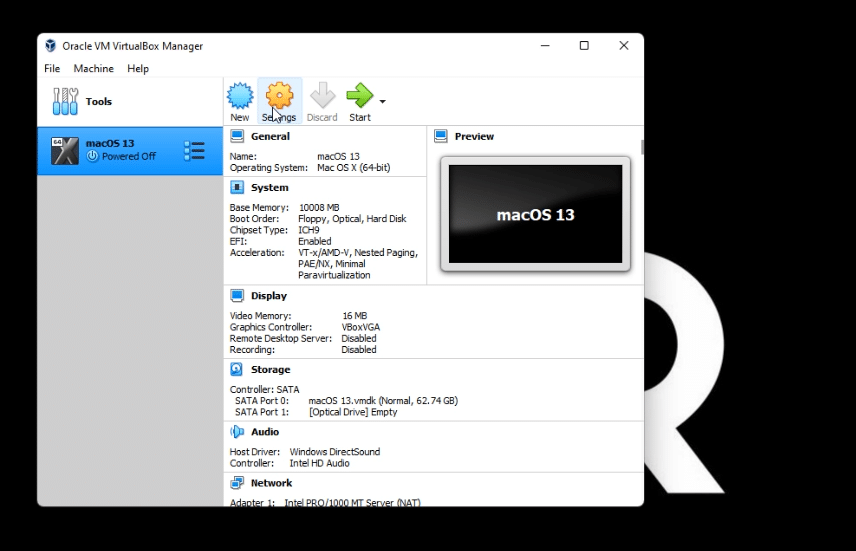
9. Under Settings, increase Base memory to the upper green limit.
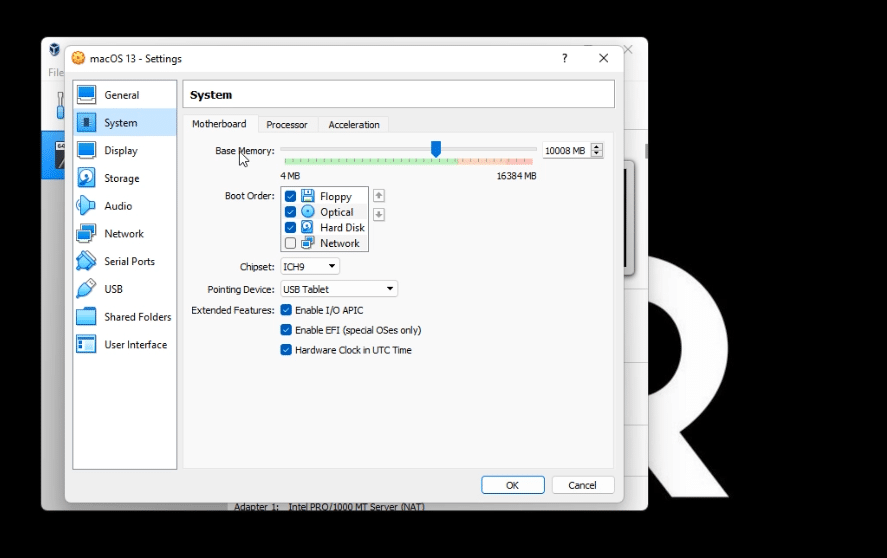
10. Increase processors to 4.

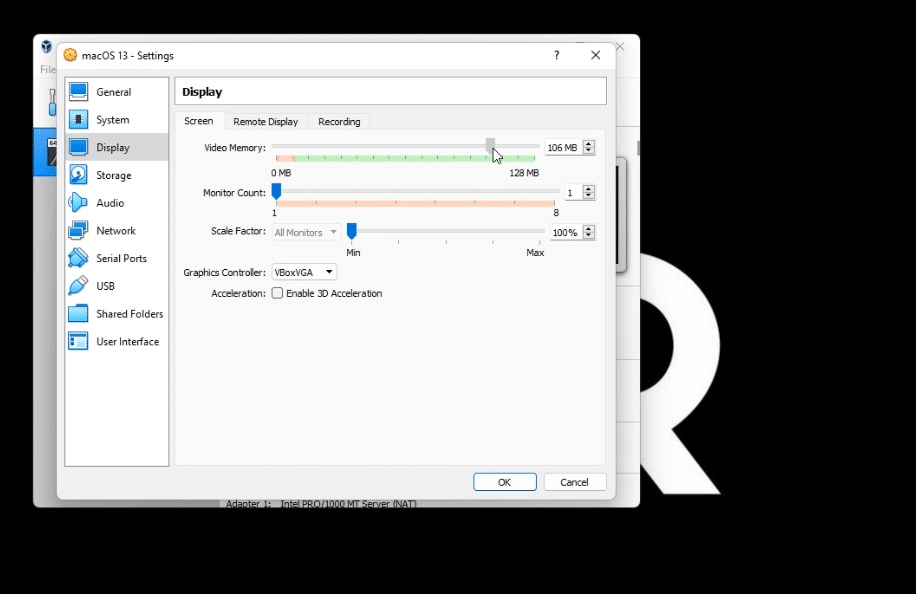
11. Under Video Memory, increase it to the upper green limit.
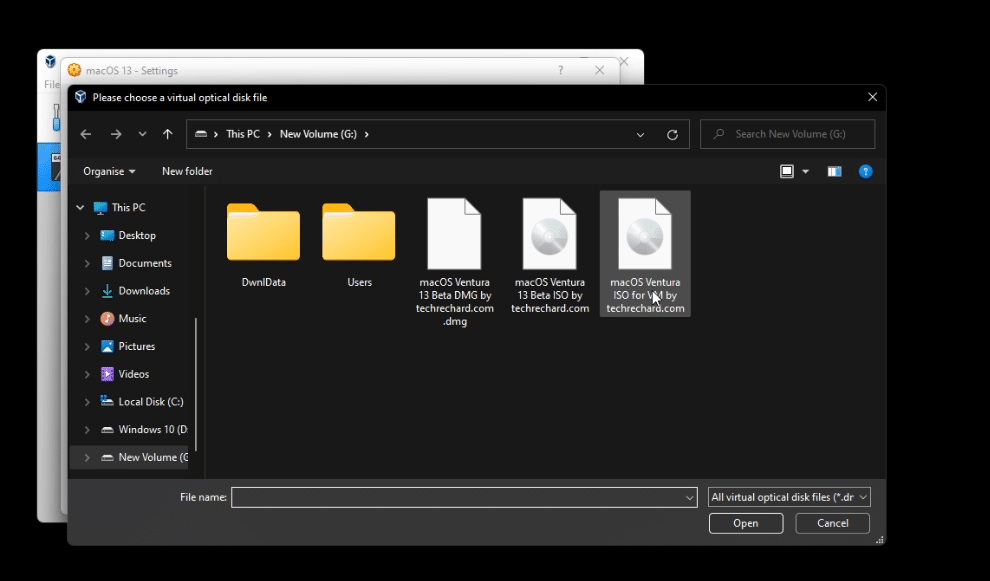
12. Under Storage, click on Empty followed by the blue disc on the right side, and select Choose a disk file.
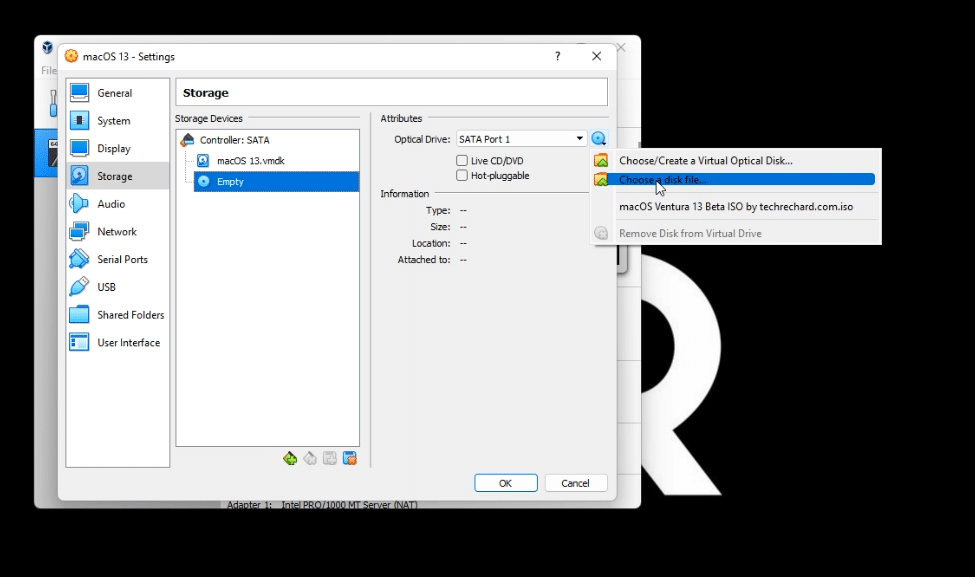
13. Select the macOS Ventura ISO image that you downloaded before and click Open.
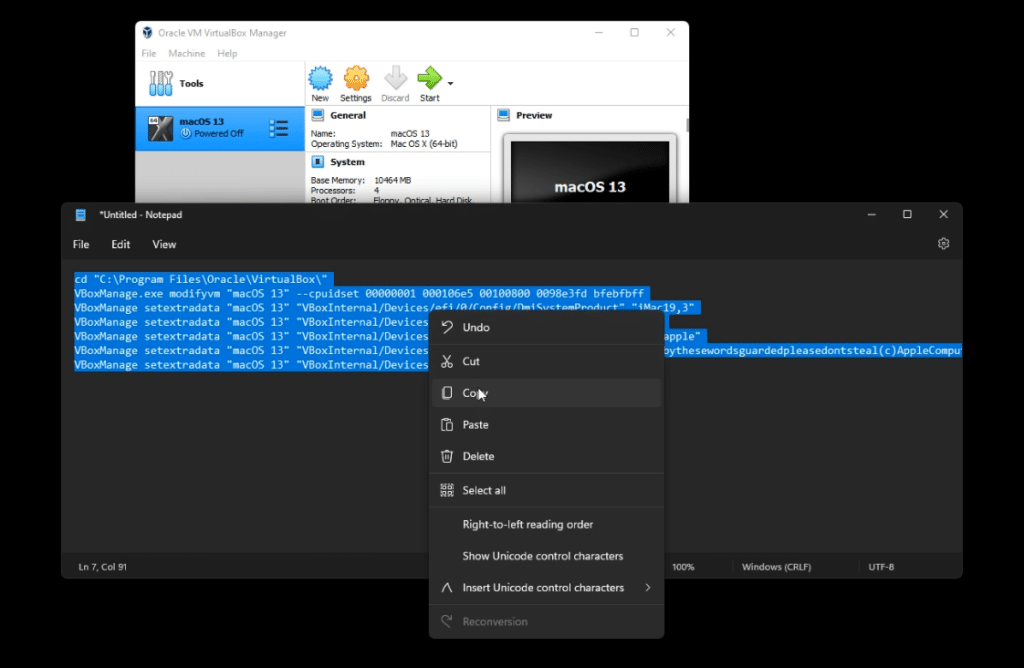
14. Copy these VBox codes on a notepad.
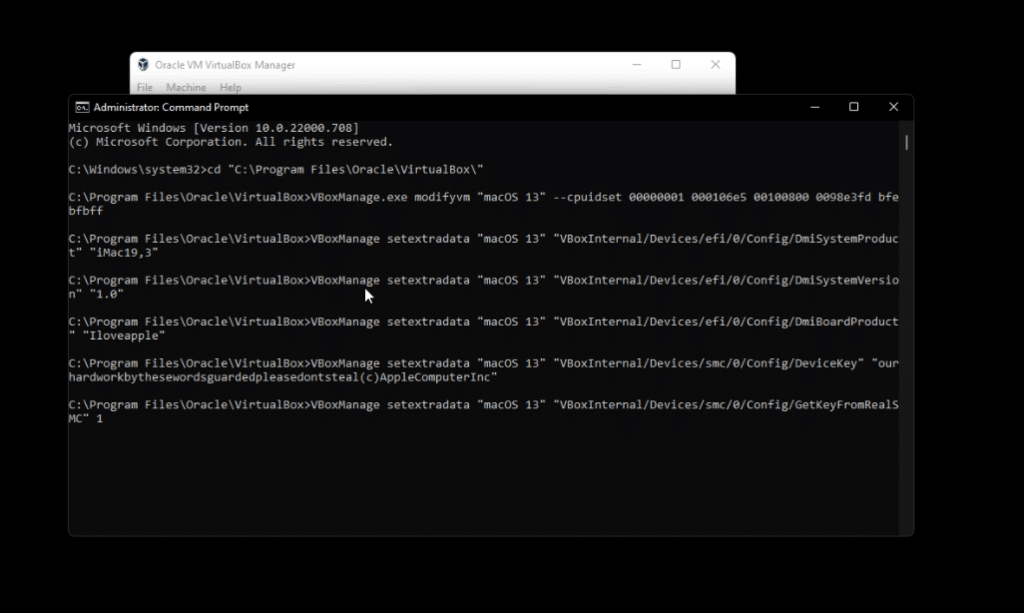
cd "C:\Program Files\Oracle\VirtualBox\"
VBoxManage.exe modifyvm "macOS 13" --cpuidset 00000001 000106e5 00100800 0098e3fd bfebfbff
VBoxManage setextradata "macOS 13" "VBoxInternal/Devices/efi/0/Config/DmiSystemProduct" "iMac19,3"
VBoxManage setextradata "macOS 13" "VBoxInternal/Devices/efi/0/Config/DmiSystemVersion" "1.0"
VBoxManage setextradata "macOS 13" "VBoxInternal/Devices/efi/0/Config/DmiBoardProduct" "Iloveapple"
VBoxManage setextradata "macOS 13" "VBoxInternal/Devices/smc/0/Config/DeviceKey" "ourhardworkbythesewordsguardedpleasedontsteal(c)AppleComputerInc"
VBoxManage setextradata "macOS 13" "VBoxInternal/Devices/smc/0/Config/GetKeyFromRealSMC" 1
15. Replace macOS 13 with your VirtualBox machine name. (I am using macOS 13 as my machine name is macOS 13). Once replaced, copy the entire thing.
16. Open your command prompt with administrator rights. You can use this guide: How to “Run as Administrator” an application on Windows: 3 Easy Methods
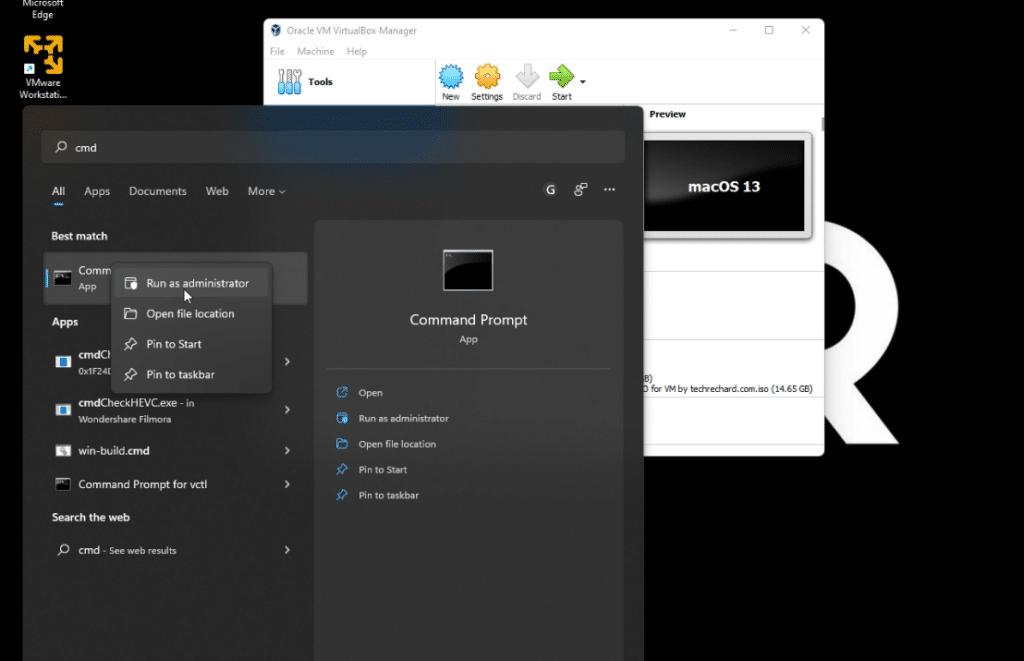
17. Press ctrl+V to paste the codes and close CMD.
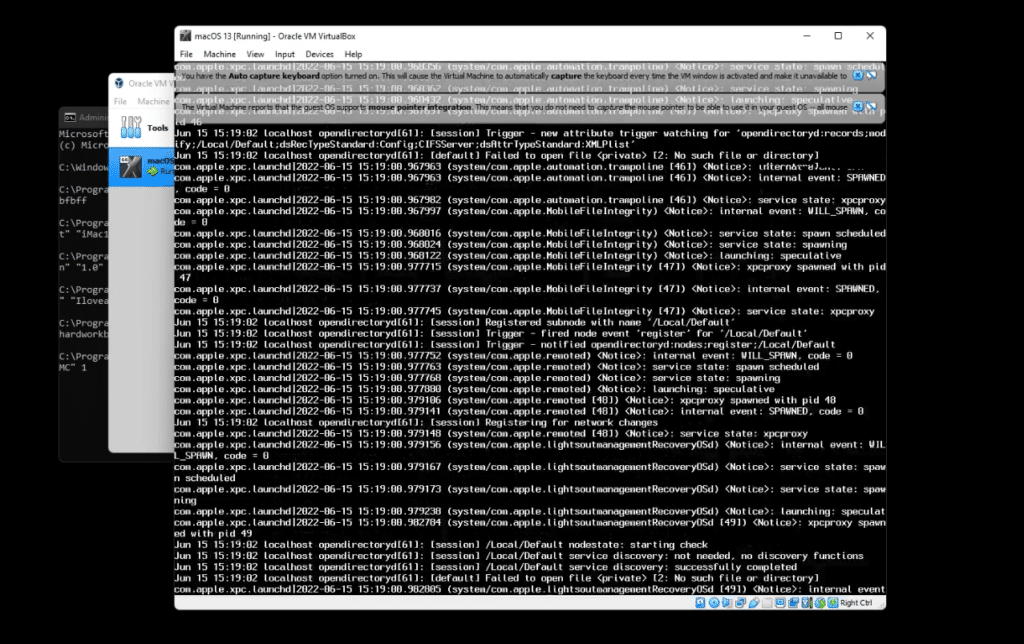
18. Open your Virtualbox again and press Start.
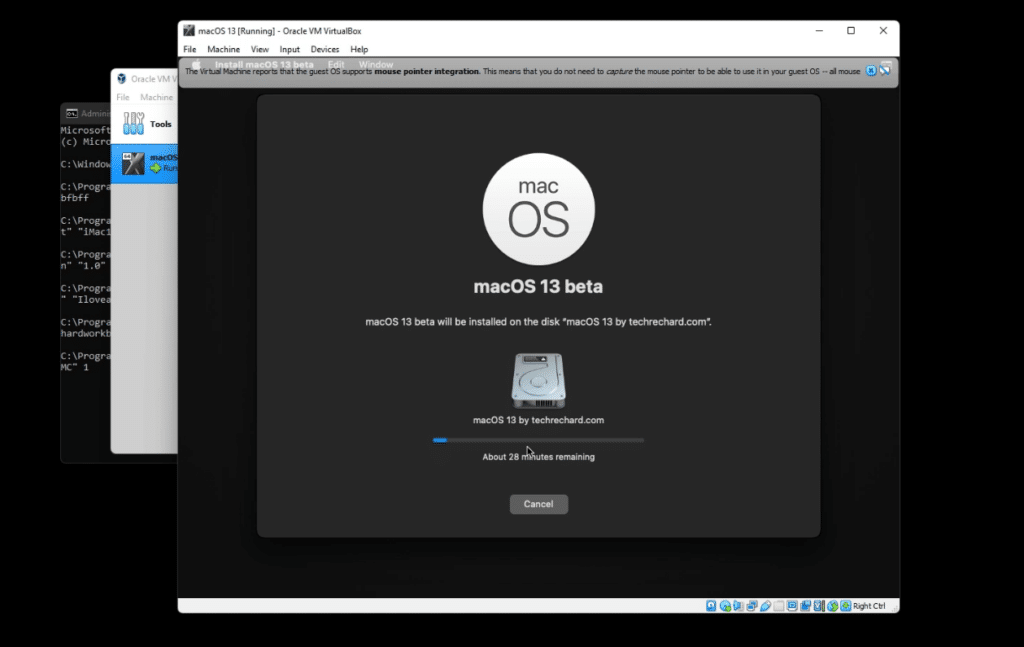
19. The process will take some time and wait for the apple logo to appear.
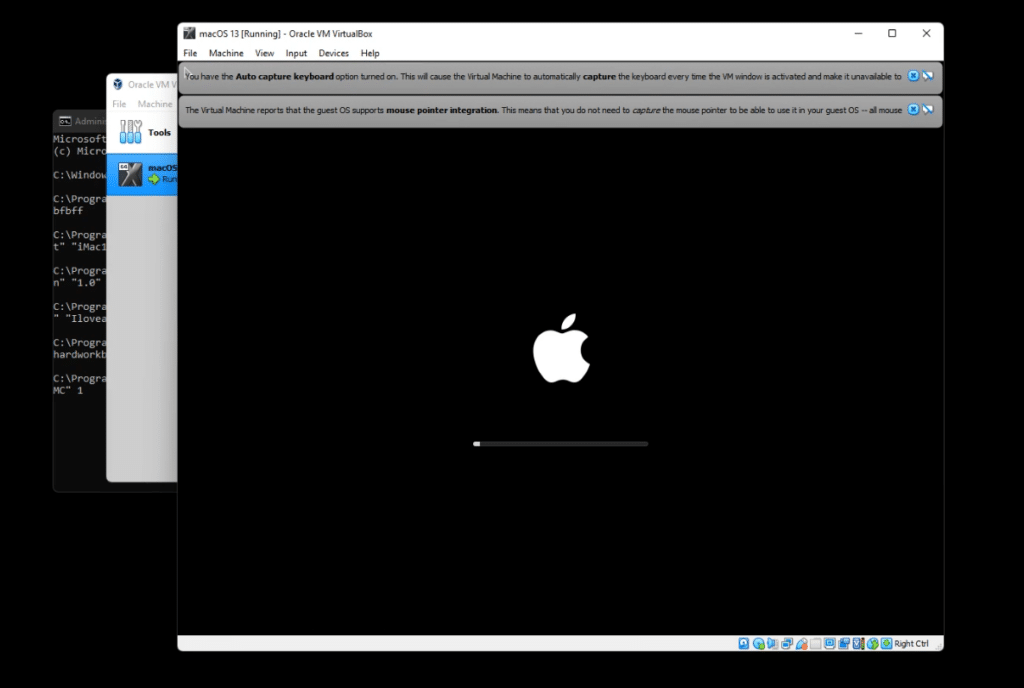
20. Now, you can simply proceed with the installation of macOS Ventura 13.
If you face any issues, here is the complete video tutorial.
Frequently faced errors: (Updated 05/05/2023)
1. Stuck in a boot loop
Solution 1: Add these commands with other VBox commands. (As suggested by a user)
VBoxManage setextradata “YOUR_VM_NAME” “VBoxInternal/TM/TSCMode” “RealTSCOffset”
Solution 2: If your VM restarts with the installation process again, you are stuck in a loop. For those stuck on the boot loop, wait like 5/7 boot loops after it stops (intel processor).
Solution 3: Restricting your processor cores to 1 will solve this issue. You can do this even after creating the complete virtual machine.
2. Failed to query SMC value from the host (VERR_INVALID_HANDLE).
Run this command in CMD:
VBoxManage.exe setextradata “VM name” “VBoxInternal/Devices/smc/0/Config/GetKeyFromRealSMC” 0
If this doesn’t work either, you can downgrade your Virtualbox, and it will work. You can find previous builds here: https://www.virtualbox.org/wiki/Download_Old_Builds_6_1
Conclusion
I hope this guide on How To Install macOS 13 Ventura on VirtualBox was easy and helpful. If you face any issues, please comment down below.
If you face any issues with Virtualbox, you can run it on VMWare. Here is the guide: Install macOS 13 Ventura on VMWare


38 Comments
I’m getting Failed to query SMC value from the host (VERR_INVALID_HANDLE).
Any solution?
Run this command in CMD:
VBoxManage.exe setextradata “Your macOS VM Name Here!!!” “VBoxInternal/Devices/smc/0/Config/GetKeyFromRealSMC” 0
If this doesn’t work, you can downgrade your Virtualbox and it will work.
When i start the VM it starts its process , after that it shows to on the mouse , my mouse is plugged in and i cant move my mouse pointer , please help
Kindly add the USB controller under VM Settings.
You need to install the Virtualbox extension as well.
I have the same error when starting the installation of a virtual machine, it asks me to turn on the apple mouse and keyboard, but I have included all the adapters of my mouse and keyboard in virtualbox. What should I do?
Install the Virtualbox Extension Pack and then select USB 2.0 or 3.0 in VM Settings. Restart your Virtual Machine!
FYI, I’m running VirtualBox 7.0.2r154219.
I’ve been pulling my hair out because I kept hitting the “No mouse or keyboard” icons right after it reached the Apple point. I have the extensions added, and USB 2.0 was enabled.
Finally, on a whim, I changed USB to 3.0. Miracle of miracles, it proceeded past the “no mouse/keyboard” point and started installing.
Just thought I’d share that in case anybody else is getting to be as bald as I am.
Thank you for the insights!
Stuck in a boot loop (intel processor) and after some iteration it stopped and stuck in console window view, Will it work now if I restart VM?
Many people are facing this issue. Try using VMWare with VMDK file. All the files are available on our site.
Try setting cpu to 2.
Use the following command along with other commands before starting the created VM or it will keep restarting:
VBoxManage setextradata “YOUR_VM_NAME” “VBoxInternal/TM/TSCMode” “RealTSCOffset”
Hi, my machine dont go beyond this comand #[EBILOG: EXITBS:START] 2022-11-21T14:24:11 Its stuck here someone can help me ?
Can you send a screenshot to admin@techrechard.com?
How did you arrange?
I’m stuck here too, AMD CPU.
VBoxManage modifyvm “name of your virtual machine” –cpu-profile “Intel Core i7-6700K”
This suggestion works for me (AMD Proc.)
my configuration for prompt:
cd “C:\Program Files\Oracle\VirtualBox\”
VBoxManage.exe modifyvm “Mac” –cpuidset 00000001 000106e5 00100800 0098e3fd bfebfbff
VBoxManage setextradata “Mac” “VBoxInternal/Devices/efi/0/Config/DmiSystemProduct” “iMac19,3”
VBoxManage setextradata “Mac” “VBoxInternal/Devices/efi/0/Config/DmiSystemVersion” “1.0”
VBoxManage setextradata “Mac” “VBoxInternal/Devices/efi/0/Config/DmiBoardProduct” “Iloveapple”
VBoxManage setextradata “Mac” “VBoxInternal/Devices/smc/0/Config/DeviceKey” “ourhardworkbythesewordsguardedpleasedontsteal(c)AppleComputerInc”
VBoxManage setextradata “Mac” “VBoxInternal/Devices/smc/0/Config/GetKeyFromRealSMC” 1
VBoxManage modifyvm “Mac” –cpu-profile “Intel Core i7-6700K”
Are you using AMD processor? That was my case. I have tried with other intel i7 computer and it worked for me.
I still get stuck in a boot loop. It panic/crashes during startup, and does that 5-6 times, and the just bring me back to the installation screen.
I’ve already tried the comments/suggestions, including running “VBoxManage setextradata “YOUR_VM_NAME” “VBoxInternal/TM/TSCMode” “RealTSCOffset”. That didn’t help at all.
Did you replace YOUR_VM_NAME with your actual VM name?
I am using Virtualbox 7.0.4 and I stuck on mouse that is not recognised.
Read this:
https://forums.virtualbox.org/viewtopic.php?f=7&t=3714
I’ve tried these instructions but I’m still getting a kernel-panic boot loop.
I’ve applied all the main VBox codes. I’ve also applied:
VBoxManage setextradata “MacOS” “VBoxInternal/TM/TSCMode” “RealTSCOffset”
And I’ve tried both GetKeyFromRealSMC 0 and 1.
And I’ve tried changing the disk type to VMDK, CPUs to 4, and RAM to 8196.
What else can I try?
Hard luck! This is a prevalent problem with Virtualbox for some users.
Try running it on VMWare with the VMDK file.
Thanks
Yep, this is me, too. Thanks for the alternate suggestion!
So I’m stuck at “[EB | LOG:EXITBS:START]” what is the solution for that?
entering this worked for me: VBoxManage.exe modifyvm “macOS Ventura” –cpu-profile “Intel Core i7-6700K”
once click on start the VIrtual box as per above instruction, getting a flashing PC up and down, what to do next
Hi!…Please help me??
VBoxManage setextradata “soVentura” “VBoxInternal/Devices/smc/0/Config/DeviceKey”
error:
VMSetError: Configuration error: Querying “DeviceKey” as a string failed
00:00:07.901868 PDM: Failed to construct ‘smc’/0! VERR_CFGM_NOT_ENOUGH_SPACE (-2109) – The specified string / bytes buffer was to small. Specify a larger one and retry.
Some idea? thx
VB Versión 7.0.8 r156879 (Qt5.15.2)
VirtualBox Boot Image [Geekrar]
It says not enough space. How much hard disk space did you allot?
try 1 cpu only
Getting stuck in boot loop after install, tried twice same reason https://pasteboard.co/D0i7yjpM46pj.png
What are you suggesting? I’ve tried all above VM settings, works just fine for install but after install it is dead.
Small question, is there a direct download of a working image disk (.vdi, .vmdk) rather than the iso file?
Try this direct VMDK file-
https://techrechard.com/download-macos-ventura-vmdk-file/
I get to the screen to install on a hard drive and nothing shows up. I created a 200 gig virtual drive when creating but nothing shows up to select
Can you attach a screenshot?
i got the same
cd “C:\Program Files\Oracle\VirtualBox\”
VBoxManage.exe modifyvm “MOS” –cpuidset 00000001 000106e5 00100800 0098e3fd bfebfbff
VBoxManage setextradata “MOS” “VBoxInternal/Devices/efi/0/Config/DmiSystemProduct” “iMac19,3”
VBoxManage setextradata “MOS” “VBoxInternal/Devices/efi/0/Config/DmiSystemVersion” “1.0”
VBoxManage setextradata “MOS” “VBoxInternal/Devices/efi/0/Config/DmiBoardProduct” “Iloveapple”
VBoxManage setextradata “MOS” “VBoxInternal/Devices/smc/0/Config/DeviceKey” “ourhardworkbythesewordsguardedpleasedontsteal(c)AppleComputerInc”
VBoxManage setextradata “MOS” “VBoxInternal/Devices/smc/0/Config/GetKeyFromRealSMC” 1
VBoxManage.exe setextradata “MOS” “VBoxInternal/Devices/smc/0/Config/GetKeyFromRealSMC” 0
VBoxManage setextradata “MOS” “VBoxInternal/TM/TSCMode” “RealTSCOffset”
use these commands before starting the VM even once (1 CPU only)
Works like a charm