

Table of Contents
In this article, we will learn how to install macOS Monterey on VirtualBox on Windows PC.
macOS Monterey is the second-latest operating system from Apple that has radically changed how you interact with your computer. It is super user-friendly and focused on improving your experience. It has a new design and includes features like FaceTime calls, AirDrop sharing, and a wholly overhauled Mail app.

All Macs will come with macOS Monterey, and they can run any app designed for the operating system. The apps let you customize your environment by switching between different modes to do other things. For example, you can easily switch between creating a presentation or writing an essay without downloading a third-party app.
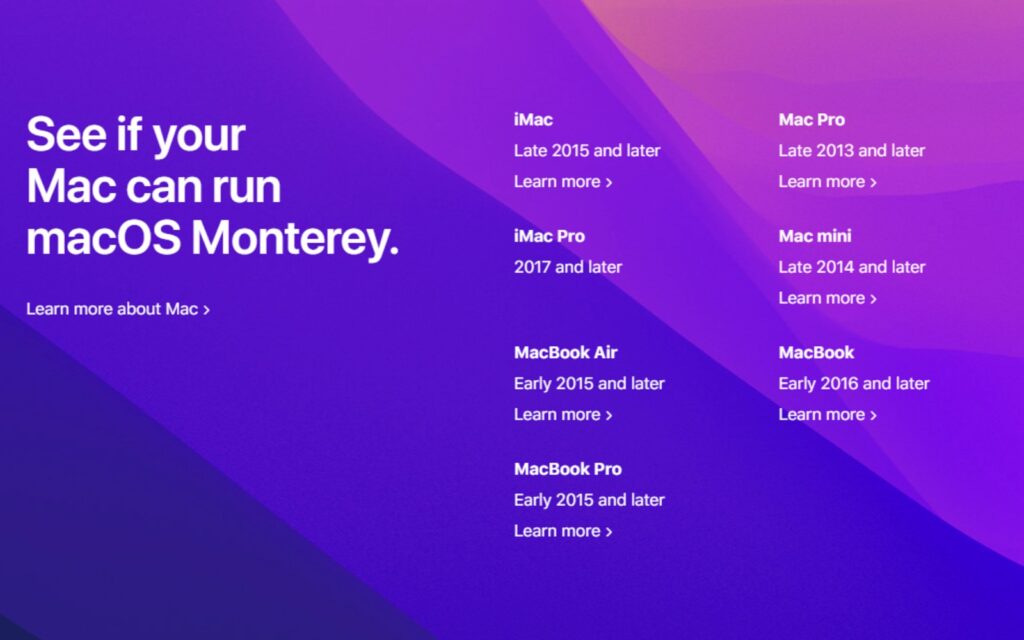
macOS Monterey System Requirements
Every software made for Mac has specific system requirements, and macOS Monterey is not an exception.
The macOS Monterey system requirements are not too high, but they do set some limitations. For example, the operating system is incompatible with older Macs, requiring a minimum of 2GB of RAM.
Step-by-Step Guide to Install macOS Monterey on VirtualBox on Windows PC
Installing macOS Monterey on VirtualBox on Windows PC is not complicated and can be done in one hour.
This article will provide a step-by-step guide on installing macOS Monterey in Virtualbox on Windows PC. The simple process can be completed in less than an hour, so panic is unnecessary.
NOTE: ENABLE VIRTULIZATION
Before installing macOS Monterey on VirtualBox on Windows PC, ensure your virtualization is turned on. Here is a video that can help you enable virtualization. You can also read this guide- How to Enable Virtualization in Windows 11? Easy Guide
Step 1: Download the required files to install macOS Monterey on VirtualBox
- Download VirtualBox and Virtualbox Extension pack.
- Download the VirtualBox Codes.
- Download macOS Monterey ISO File
Step 2: Install Virtualbox and Virtualbox Extension Pack
The next step is to install the Virtualbox and Virtualbox extension pack you downloaded in step 1. You can take the help of this video and install Virtualbox and Virtualbox Extension Pack on your Windows PC.
Step 3: Setting up your Virtual Machine to install macOS Monterey on VirtualBox
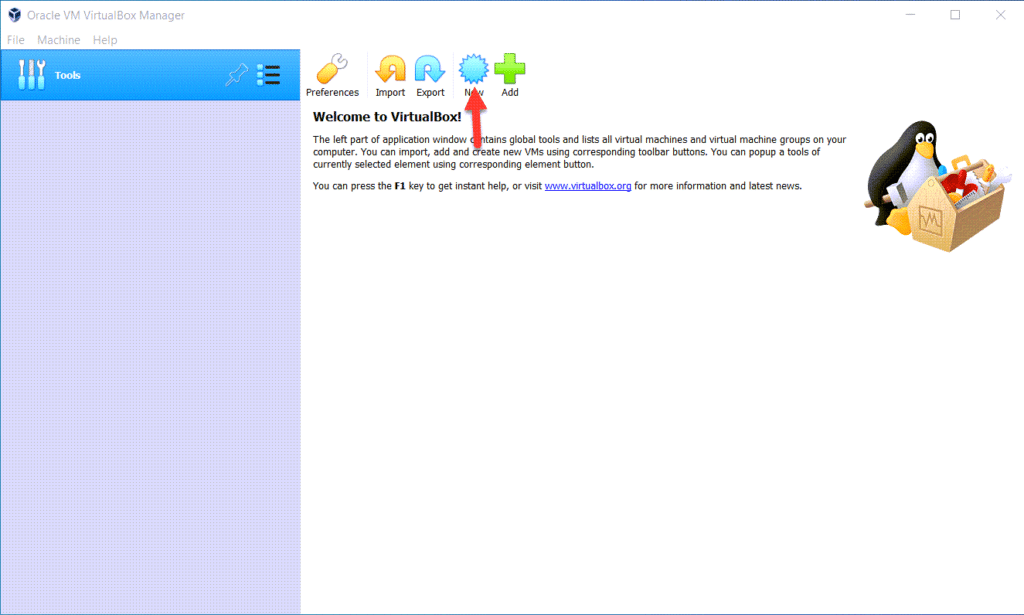
1. Open Virtualbox and click New.
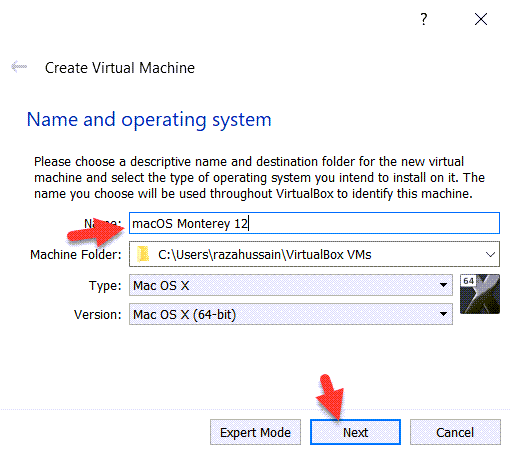
2. Enter the name of your Virtual Machine (macOS Monterey 12 in my case)
Set the following parameters:
- Type: Mac OS X
- Version: Mac OS X (64-bit)
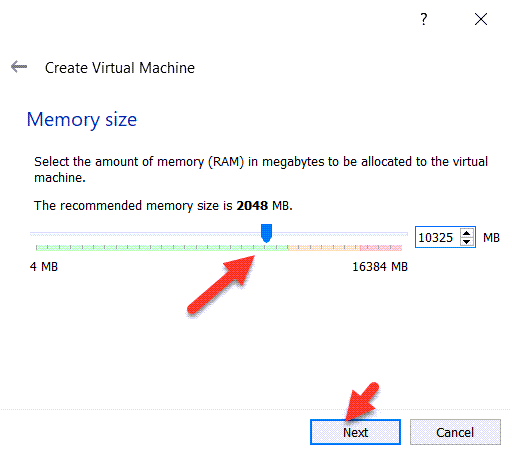
3. Increase your memory size to anything greater than 2048 MB.
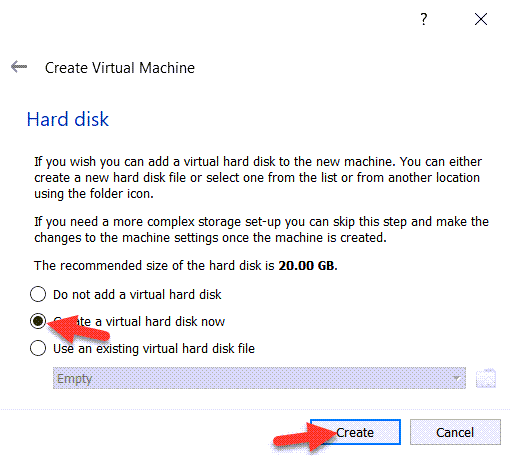
4. Select the create a virtual hard disk and click Next.
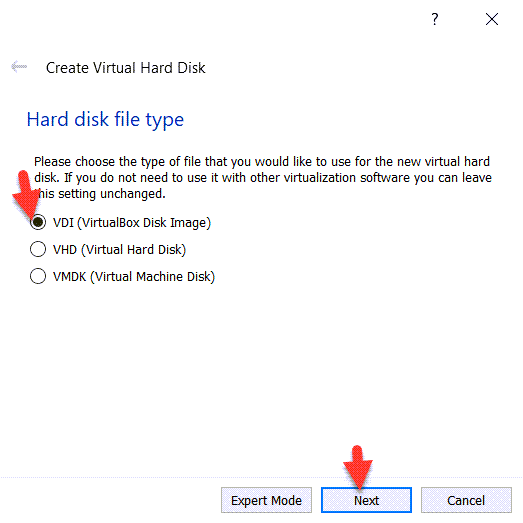
5. Select VDI (VirtualBox Disk Image) and click Next.
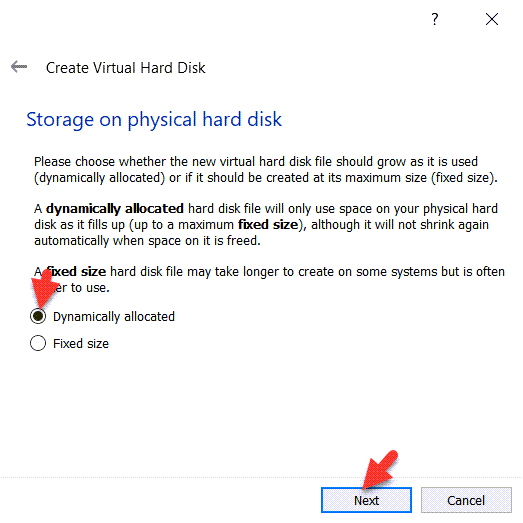
6. Select Dynamically Allocated and click Next.
7. Select File Location where you want to save your virtual machine, set the Hard Disk’s size to 120 GB, and click Create.

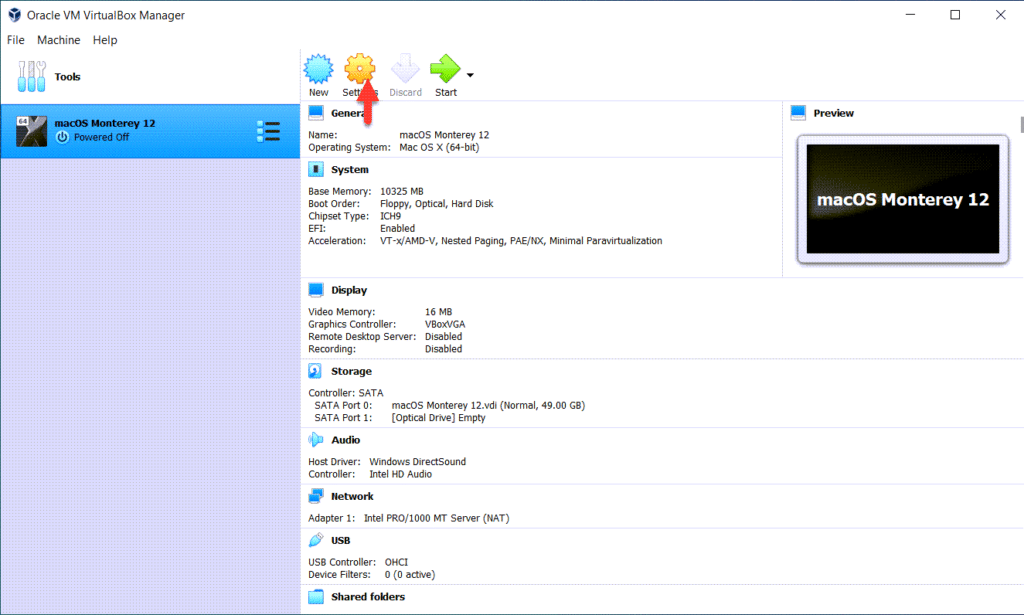
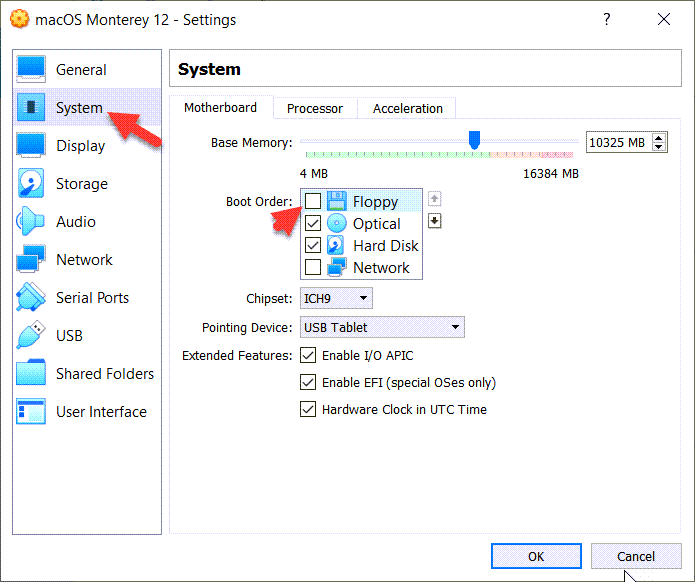
8. Click Settings.
9. Remove Floppy Disk.
10. Go to Processor and increase the number of processors up to 4.

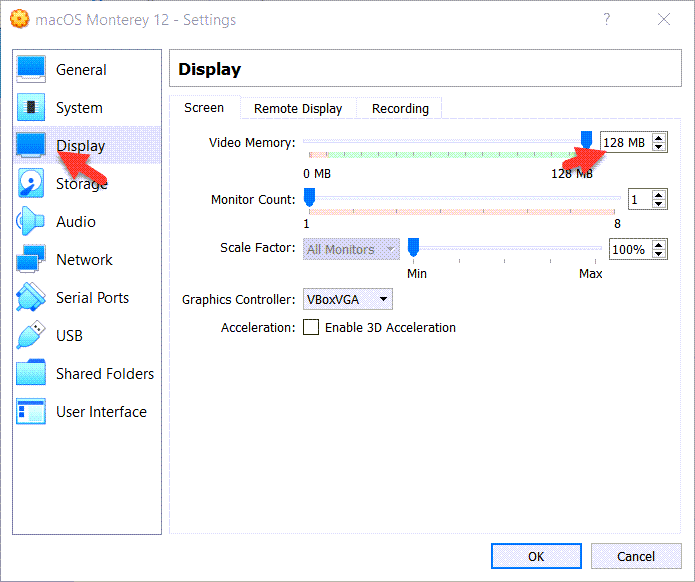
11. Go to the Display, and increase the number of Displays up to 128MB.
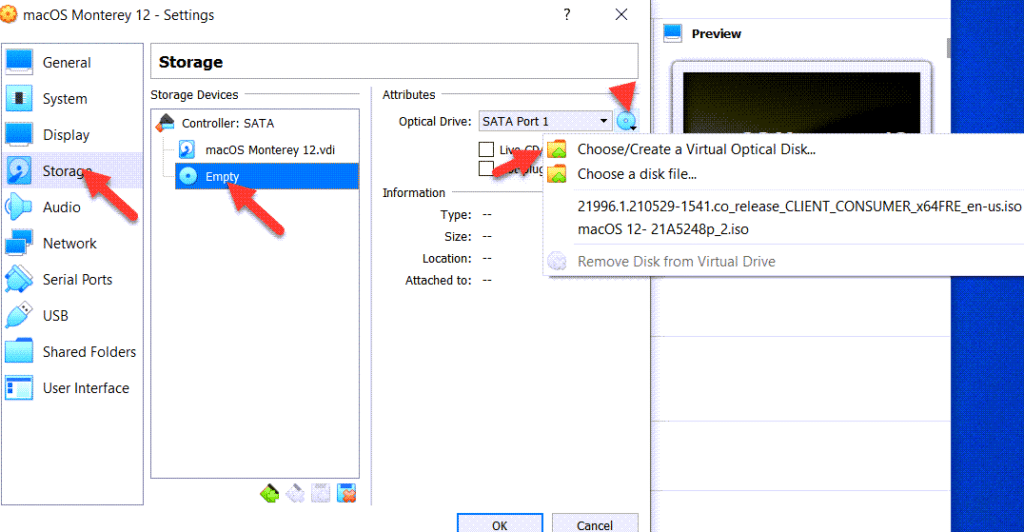
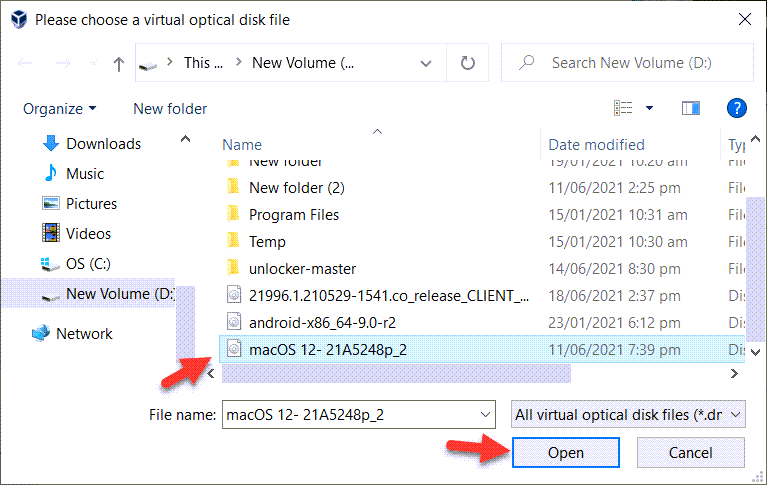
12. Go to Storage and click Empty. Then click on the blue disk icon and select Choose/Create a virtual optical disk.
13. Click Add.
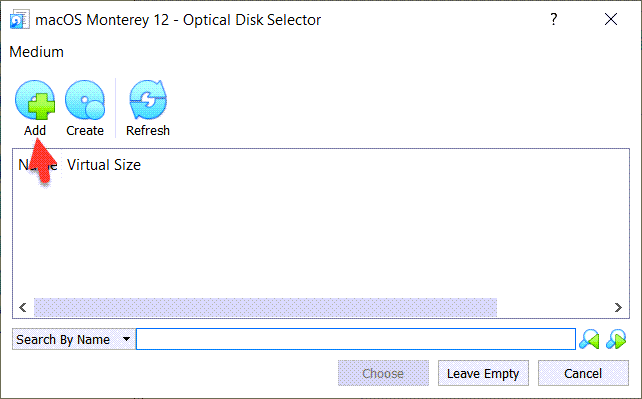
14. Locate the macOS Monterey ISO file that you have downloaded in step 1, click Open, and click Choose.
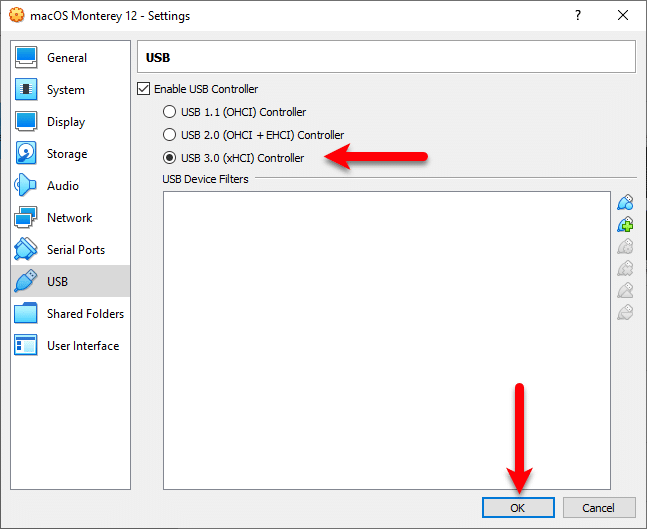
15. Go to USB and select USB 3.0 (xHCI) Controller and click on the OK.
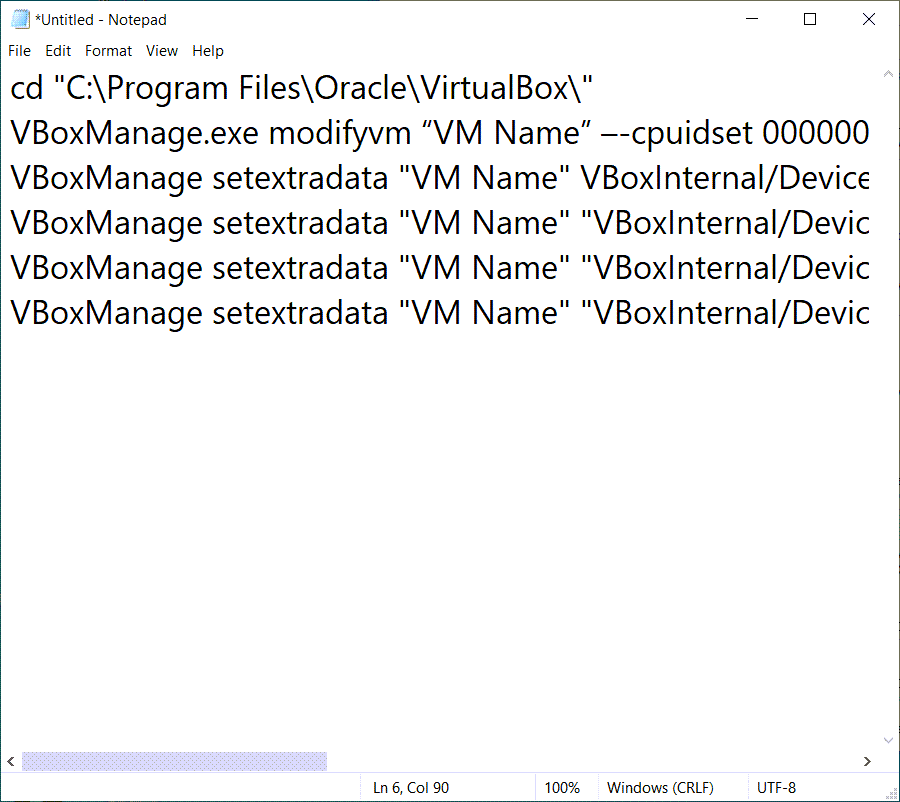
Step 4: Adding VirtualBox Codes
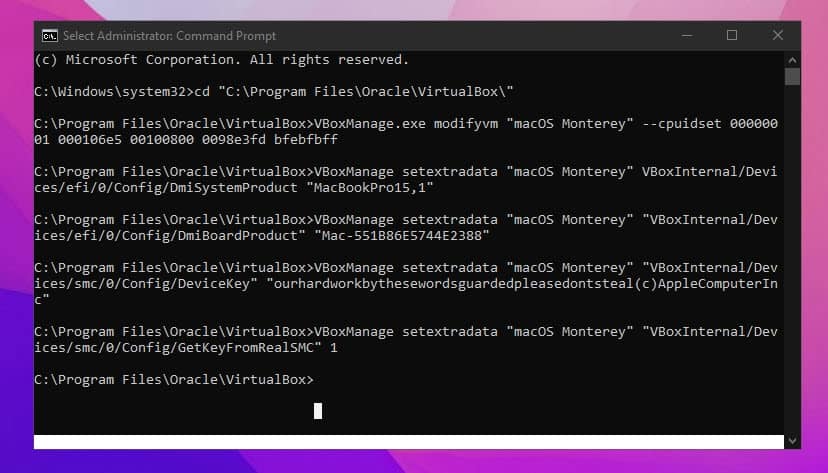
1. Copy the Virtualbox codes that you downloaded in step 1 and paste them on your notepad.
2. Click Edit and then Replace.
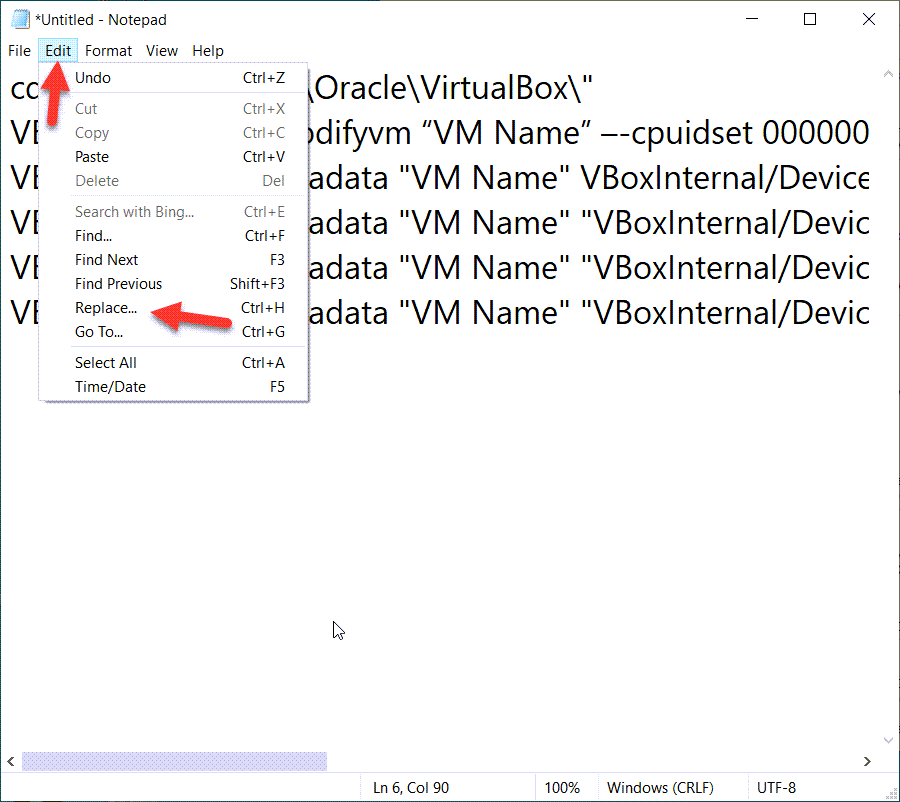
3. Now, you have to substitute the VM Name with the name of your virtual server (MacOS Monterey 12– in my case).

4. Close your VirtualBox.
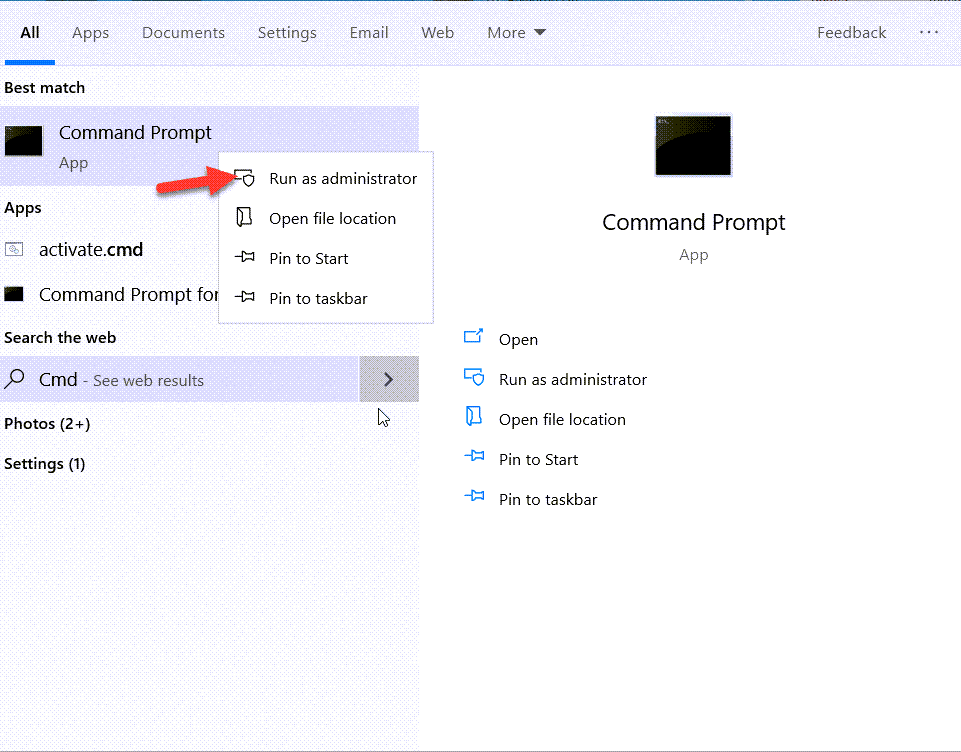
5. Open your CMD by clicking Start and searching CMD. Right-click and select Open as administrator.
6. When it opens, you need to copy and paste the code line by line to Command Prompt. You can copy the entire contents from the notepad file—Right-click in the CMD and click paste. And keep pressing at each stage.
If you get any error, this means you skipped any step and repeat the same process. If you are stuck, leave a comment below, and I will help you out.
Step 5. Performing macOS Monterey clean Installation
Now it is time to perform the clean installation of macOS Monterey on VirtualBox on Windows PC. So, let’s start the process to Install macOS Monterey on VirtualBox on Windows PC.
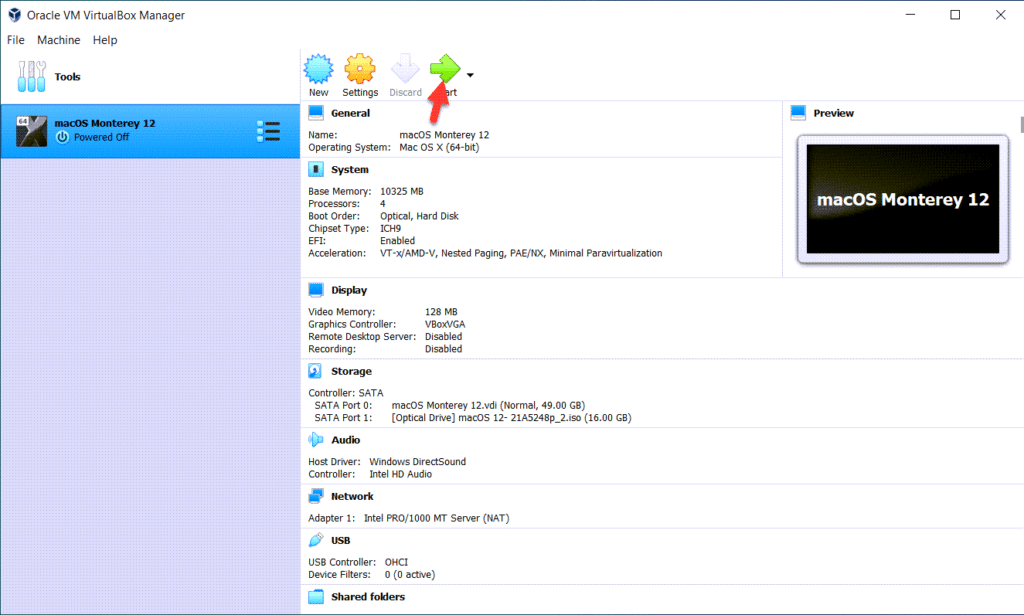
1. Open your Virtualbox again and select your macOS Monterey 12 and click Start.
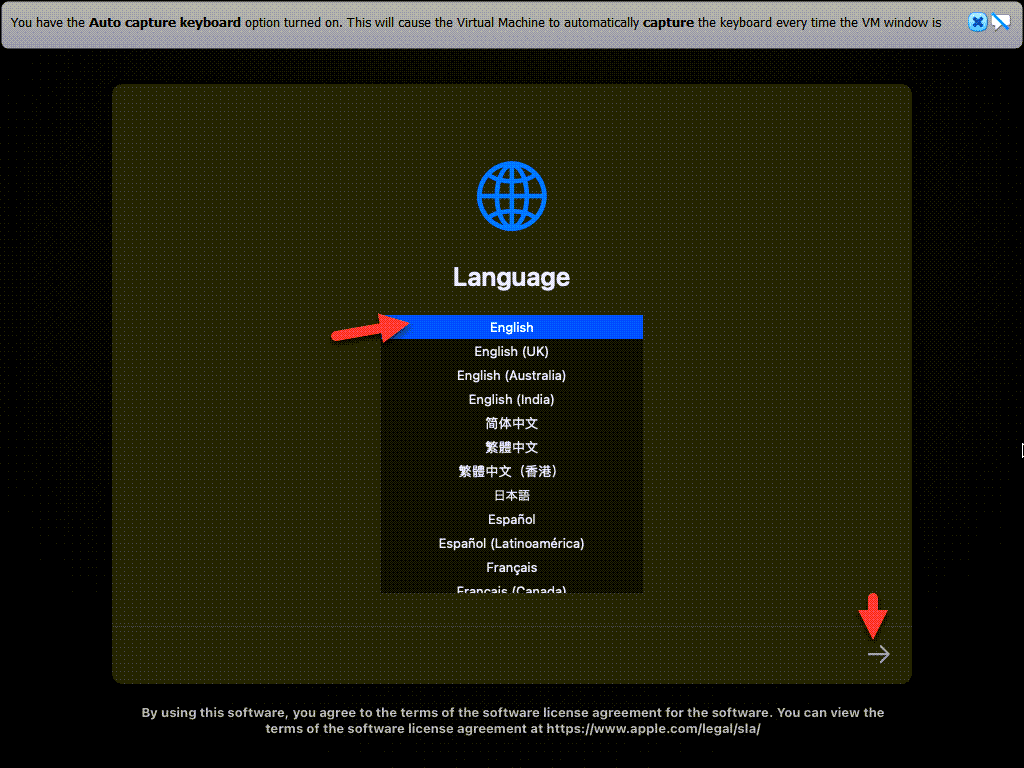
2. Wait for a while until the codes are executed, and you will see the Language section. Select the language of your choice and click the -> arrow.
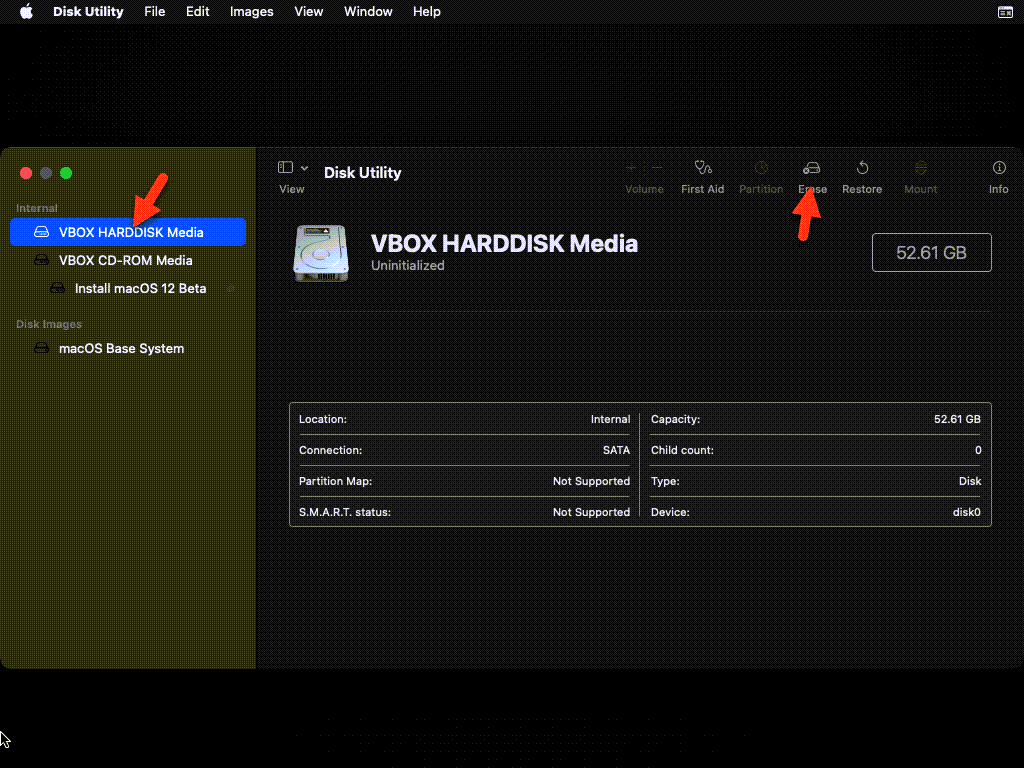
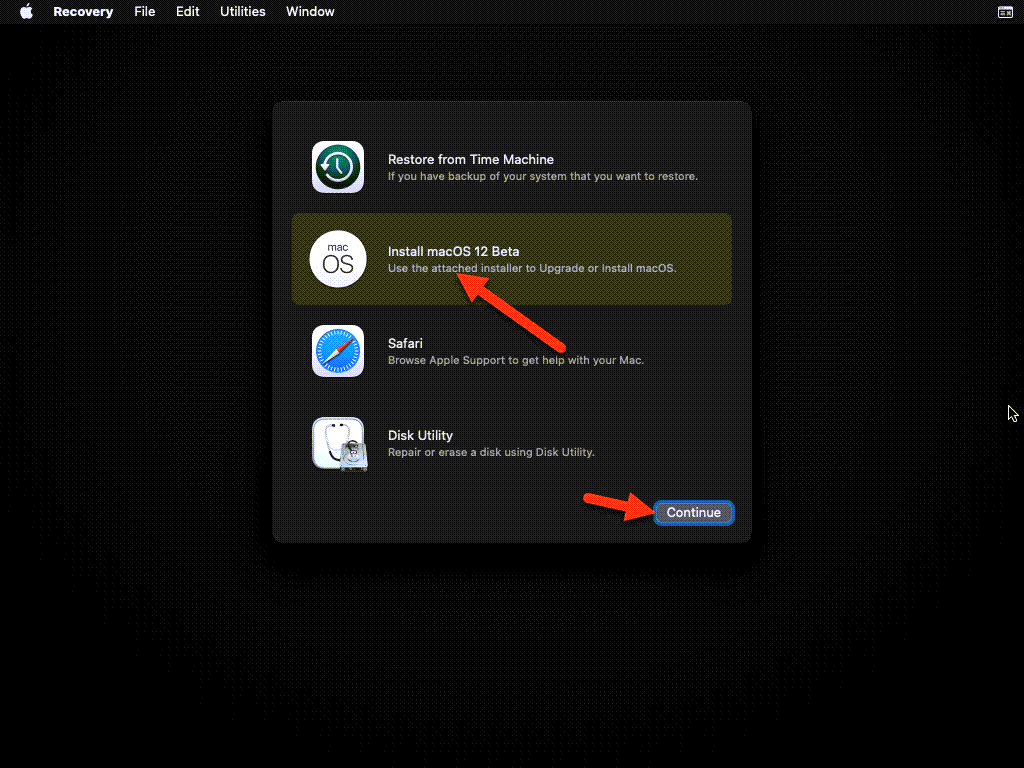
3. Click Disk Utility and click Continue. Click VBox HARDDISK Media and click Erase.
4. Close the Disk Utility and click Install macOS 12 beta.
5. Now, you need to continue with the installation process. The process of Installing macOS Monterey on VirtualBox is now simple. If you are stuck somewhere, please comment below. Also, here are some common errors that you might face- How to Fix Common macOS Monterey Errors
If you are unable to understand this process and still want to run macOS Monterey on Windows, you can use this guide- How To Install macOS Monterey On Vmware On Windows Pc? 4 Step Easy Guide
Conclusion: Install macOS Monterey on VirtualBox
I hope this guide on how to Install macOS Monterey on Virtualbox on Windows PC was easy. If you face any issues, you can comment down below.


13 Comments
I followed all the steps, and when I go to start my virtual machine (step 5), I get the following error:
Failed to open a session for the virtual machine MacOS.
Failed to query SMC value from the host (VERR_INVALID_HANDLE).
Result Code: E_FAIL (0x80004005)
Component: ConsoleWrap
Interface: IConsole {872da645-4a9b-1727-bee2-5585105b9eed}
Could you take a screenshot and attach it to the comment section?
Solution:
1. cmd (admin)
2. bcdedit /set hypervisorlaunchtype off
3. reboot system
Have some problem, but this solution not work for me.
When I do the first command, I get these errors,
VBoxManage.exe: error: Could not find a registered machine named ‘“MacOS’
VBoxManage.exe: error: Details: code VBOX_E_OBJECT_NOT_FOUND (0x80bb0001), component VirtualBoxWrap, interface IVirtualBox, callee IUnknown
VBoxManage.exe: error: Context: “FindMachine(Bstr(a->argv[0]).raw(), machine.asOutParam())” at line 547 of file VBoxManageModifyVM.cpp
I dont get the same errors with any other of the commands though…
You have to change “MacOS” to name of your vurtual machine, you have created (maybe “macOS Monterey 12”) in all commands
I’m stuck on the boot screen after the installation to the hard drive. It’s been saying “less than a minute remaining…” for over an hour.
Try restarting the Virtual Machine!
For those that get “Kernel: Panic Reboot” on installing or on using(vmdk file) try this
setextradata “VM Name” “VBoxInternal/TM/TSCMode” “RealTSCOffset”
this may slove the random reboot/crash
C:\Program Files\Oracle\VirtualBox>VBoxManage.exe modifyvm “macOS monterey” –cpuidset 00000001 000106e5 00100800 0098e3fd bfebfbff
VBoxManage.exe: error: Could not find a registered machine named ‘macOS monterey’
VBoxManage.exe: error: Details: code VBOX_E_OBJECT_NOT_FOUND (0x80bb0001), component VirtualBoxWrap, interface IVirtualBox, callee IUnknown
VBoxManage.exe: error: Context: “FindMachine(Bstr(a->argv[0]).raw(), machine.asOutParam())” at line 547 of file VBoxManageModifyVM.cpp
You need to replace ‘macOS Monterey’ with your Virtual Machine name that you have kept.
After doing the entire process, the message remains that says, there is less than a minute left, I have already restarted the machine several times and the installation process starts again from 0
Linux host…
VBoxManage modifyvm macOS –cpuid-set=00000001 000106e5 00100800 0098e3fd bfebfbff
Thanks for the tutorial and links.