

Table of Contents
Screenshotting your screen on Mac can be done in many different ways, depending on how often you need to screenshot your screen. If you don’t take screenshots often, follow this guide for using the default macOS tools (the key combination will vary depending on which version of macOS you’re using). For more advanced users, an app like Skitch or Snapz Pro X might. We’ll touch on shortcuts, tips and tricks, and advanced settings for your Mac. This should help any beginner or intermediate Mac user to get more out of their computing experience.
macOS Mojave and later came with a Screenshot app that offers advanced features like a timer, select save location, show/hide mouse pointer; and more; while it can even screen record.
The new screenshot functionality is free and available to all Apple Mac users, no app installation is required.
But if you want something with even more features, a third-party app is better for this. In the following, we’ll compare both methods.
How to take a Screenshot on Mac with macOS built-in tools
If you want to take a screenshot on your Mac, here are the keyboard shortcuts you need to know:
Entire screen: shift + command + 3
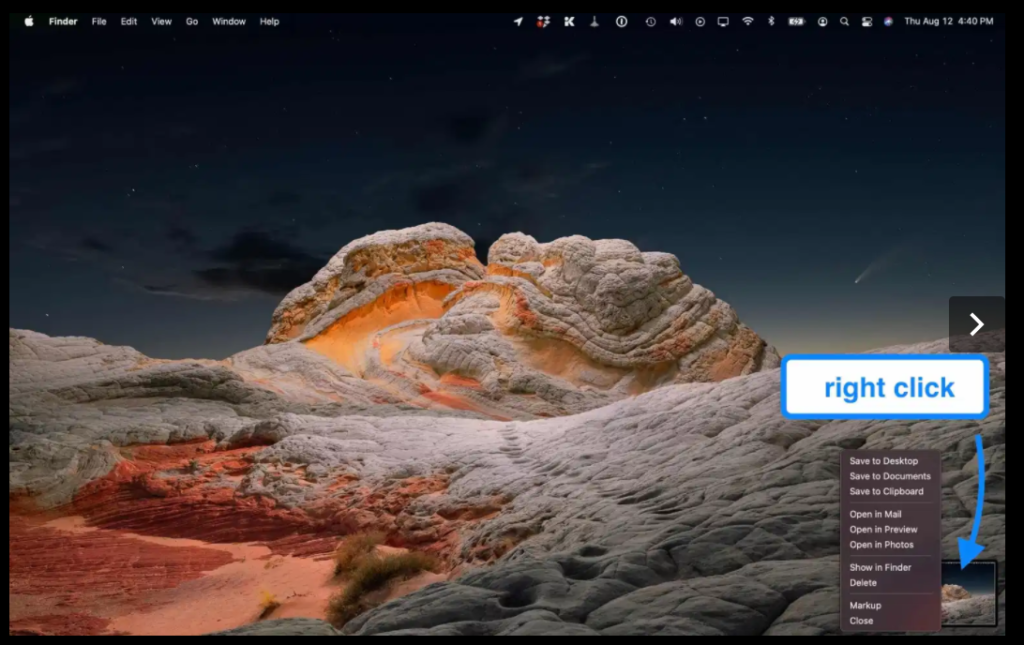
- When you take a screenshot, you’ll see a preview of it in the right bottom corner on your Mac.
Now here are the things that you can do:
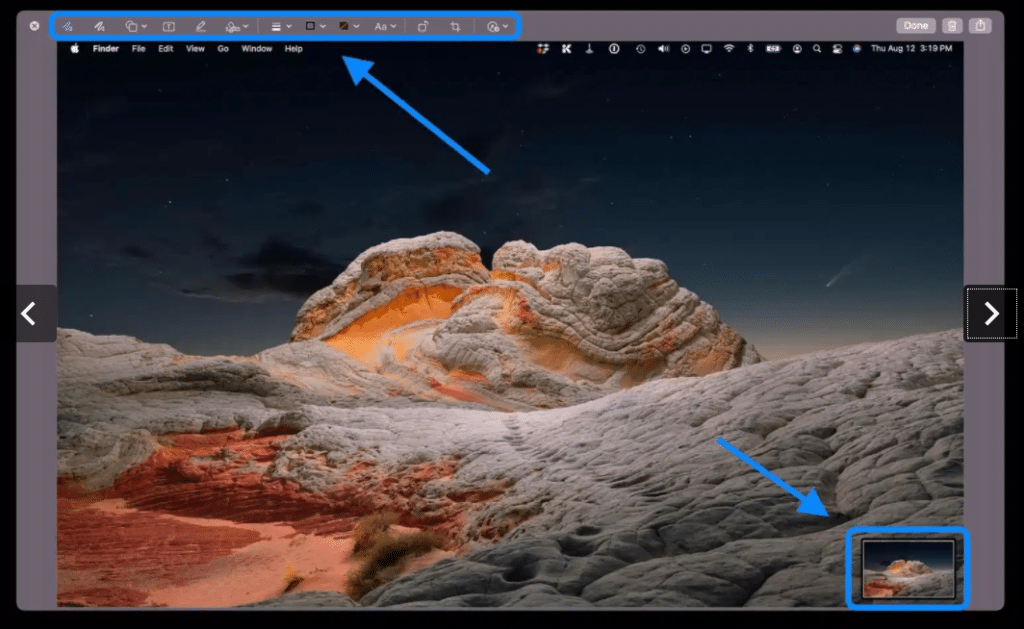
- Edit the screenshot: Simply Click on it.
- Get more options: Use right-click
- Dismiss: Swipe
Selected portion: shift + command + 4
- To take a screenshot, first click your cursor to pull up the crosshair, then use it to select the area you’d like to capture.
- Holding the space bar while dragging will allow you to select more than one line of text at a time.
- To cancel the screenshot: Use ESC.
- To take the selected screenshot: Leave the mouse
Screenshot a window, menu, the Dock: shift + command + 4 + space bar
- Showing you two images of screenshots, the first is a camera icon on top of some text, and the second is a camera icon on top of the same text with different words.
- Hover over areas of the screen to capture it – for example, by hovering over a browser window and its menus and title bar, the icons in your Dock or on your desktop, or even just hovering above a part of your Mac’s desktop without having to scroll around.
- Take the screenshot by clicking inside of the window or one of its menu items.
- You can also hold the alt key to remove the shadow border from window screenshots.
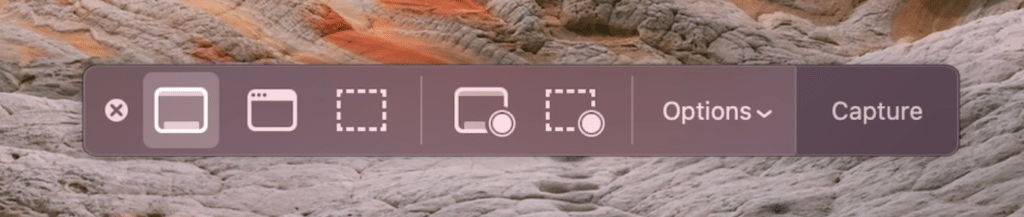
With macOS Screenshot app: shift + command + 5
- Now you’ll have the ability to choose from showing the entire screen, a particular window, or a section of the screen. From there, you can start recording your screen by choosing whether it will be an entire recording or for a specific time period. You also have the option to take their screenshots and edit them with built-in tools.
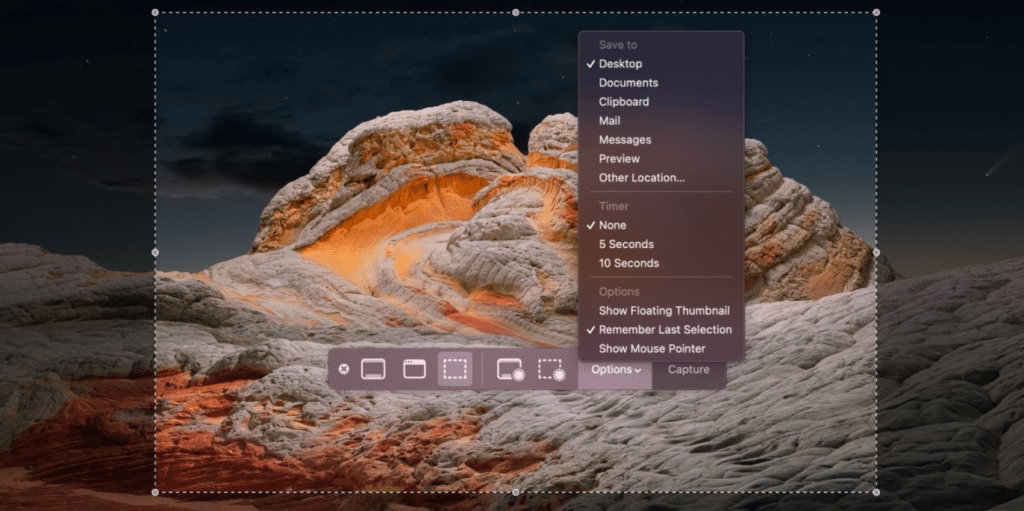
Click Options to customize your screenshot preferences
- This app is very user-friendly, with lots of helpful editing tools. This includes the timer function, which you can use to plan out your posts ahead of time. You can also customize how you save your text to different types of media and make screenshots with ease.
- The Capture button will allow you to save your screenshot!
- One quick and easy way to take lots of screenshots without having to constantly hover over the edge of your screen, is to take a screenshot that’s similar to one you’ve taken before, then use the key combination Shift + Cmd + 5. This will set a region/selected portion and let you quickly repeat it as often as needed.
For Macbook Pro users, if you’re using shift + command + 4 or 5 on your touch bar, you’ll get screenshot controls.

Other things to keep in mind: there’s no screenshot support on the Apple TV app and if you want to customize shortcuts, head to System Preferences > Keyboard > Shortcuts > Screenshots.
How to change screenshot default from PNG to JPG
By default, screenshots on Mac save to the desktop as PNG files, which tend to be larger files. To change the default to JPG (smaller file sizes), follow these steps:
- Open the Terminal app.
- Enter the following command:
defaults write com.apple.screencapture type JPG
- Press Enter.
How to take a screenshot on Mac with third-party apps
CleanShot X is our top recommendation for all Mac owners looking to take a screenshot. With over 50 features, it covers pretty much every screen capture type you can think of.
Cleanshot X for mac starts from $29 for a one-time purchase that includes a year’s worth of updates. A subscription option is also available for annual updates past the first year. CleanShot Cloud Pro offers all the features including custom domain name, branding, and self-destruct control for $8/month per user when paid annually.


