Table of Contents
In this article, we will learn some general fixes that occur when installing Windows 11 on Virtualbox. “This PC can’t run Windows 11” is the most common error that we get when we install Windows 11 on Virtualbox. So, let’s find all these errors and solve them for you.
The pre-final build of Windows 11 recently became public, and users worldwide were quick to install a new operating system on a virtual machine using tools like Virtualbox.
Windows 11 received a completely redesigned user interface, a minimalistic design, and a more relaxed Start menu. The taskbar in Windows 11 is centered by default, just like in macOS, but you can move it to the left if you want.
If you try to install Windows 11 on a virtual machine (How to install Windows 11 on Virtualbox: {Free Download} Windows 11 ISO File), you may encounter some difficulties. Many users encounter errors when installing a new system in VirtualBox. As a rule, there are errors “This PC can’t run Windows 11”. Fortunately, in most cases, you can quickly resolve the error by using the solutions below.
This PC can’t run Windows 11 on Virtualbox: Step by Step Solutions
Solution 1: Change the Selected Version of Windows
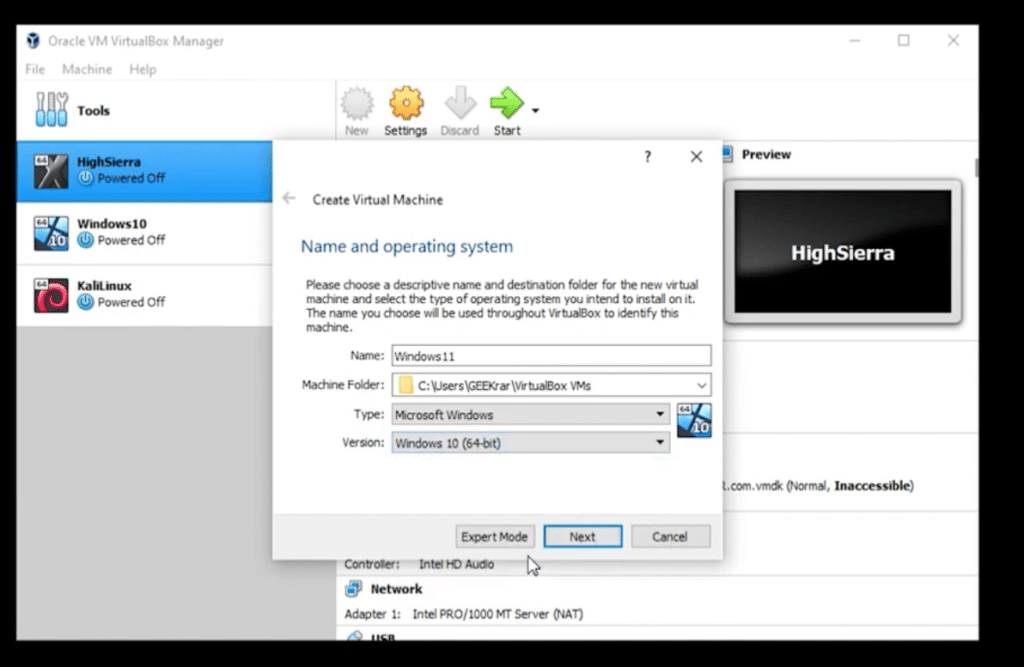
Virtualbox allows you to select the target version of Windows and configure the resources of your virtual machine accordingly. However, since Windows 11 was not officially released, and only an internal test build of the system is available on the network, you will not find Windows 11 in the list of available operating systems. And if you choose the wrong version of Windows, you may encounter errors and failures. Fortunately, this can be easily changed – select “Windows 10” or “Windows 7” in the virtual machine settings, and everything should work.

Solution 2: Choose Your VBoxSVGA Video Adapter
If you select the wrong version of Windows, this option may not be configured correctly. You will need to go to the virtual machine settings and select VBoxSVGA as the video adapter in the display settings. This will allow you to allocate enough graphics resources for your virtual machine for a hassle-free installation of Windows 11.

Solution 3: Enable the TPM
Trusted Platform Module, better known as A TPM, is a microcontroller soldered on a motherboard that stores encryption keys and other essential data that helps verify the identity of your platform. To run virtual machines on any modern system, you need to enable TPM in the UEFI/BIOS settings. TPM is enabled by default on most systems, but if you continue to encounter errors when installing Windows 11, we recommend checking the TPM status on your PC. If it’s off, turn it back on and try again. Once enabled, you can easily install Windows 11 on your virtual machine in VirtualBox.
Here is a complete guide that will help you enable TPM- How to Fix the “This PC can’t run Windows 11” Error: TPM on BIOS
Alternatively, you can install Windows 11 without TPM as well. Here is a complete guide- How to Install Windows 11 without TPM 2.0 and Secure Boot
Solution 4: Enable Virtualization Support
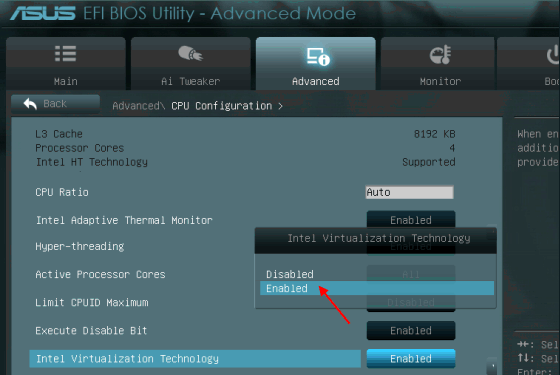
Virtualization or VT is another UEFI/BIOS configuration required for virtual machines to function correctly on any system. This option helps and allows your system to virtualize processors for the virtual machine. It can cause the error “This PC can’t run Windows 11”. Restart the system and make sure VT is enabled in your UEFI. If virtualization is disabled, turn it on and try installing Windows 11 again. All virtualization issues must now be fixed.

Here is a complete video walkthrough that will help you enable virtualization.
Solution 5: Replace the appraiserres file.dll
In some cases, problems occur because of the appraiserres.dll file contained in the installation ISO image. If the above fixes did not help you, you could replace this file with the version offered by one of the Reddit users. Extract the ISO image to a directory, and then replace the file in the directory with that or appraiserres.dll – Google Drive. Here is a small guide that will help you Solution 5: Replace the appraiserres file.dll .
- Download and extract the file mentioned above and copy it.
- Now go to your extracted ISO folder and open the ‘Sources’ folder in it.

- Now paste the copied file here and click replace the file in the destination.

Conclusion: “This PC can’t run Windows 11” on Virtualbox
Hopefully, these fixes (“This PC can’t run Windows 11” on Virtualbox) helped you install Windows 11 effortlessly in Virtualbox. Did you manage to install Windows 11 in VirtualBox? Share in the comments below.


