

Table of Contents
As we delve further into Disk Utility, Apple’s built-in app for managing and manipulating storage devices on macOS, we come across a few lesser-known features that can significantly enhance your experience. In this article, we’ll uncover these hidden gems and show you how to make the most of them.
Resizing Disk Images
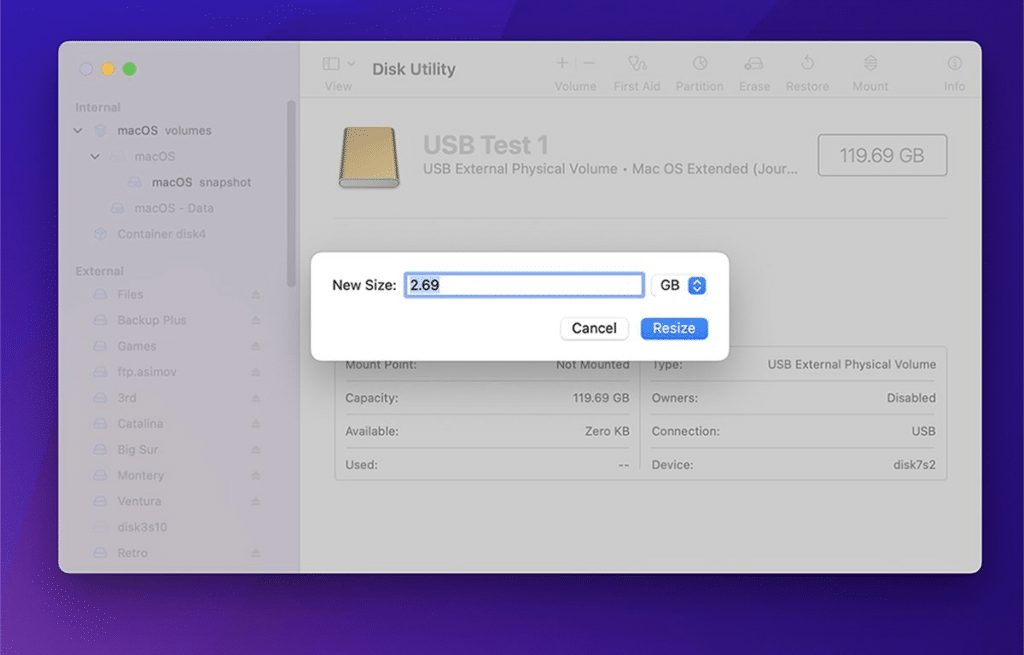
If you need to resize a disk image, ensure it’s unmounted. You can achieve this by dragging its volume from the macOS desktop to the Trash in the Finder or clicking the small “Eject” symbol next to its name in the Disk Utility sidebar.
Once the disk image is unmounted, navigate to “Images” in the main menu of Disk Utility and select “Resize…”. A file opener window will appear, allowing you to choose the disk image file from your storage.
After selecting the image, a sheet will prompt you to enter the desired new size for the disk image. Input the appropriate value and click “Resize” to initiate the resizing process.
Converting Disk Images to Different Formats
Disk Utility offers a convenient image conversion feature, enabling you to change a disk image’s format and encryption (if any). You can choose from any of the four source formats discussed in the previous part of this series.
For instance, if you have a read-only disk image, you can convert it to a read-write format or vice versa using this conversion feature.
To convert an image, go to the main menu and select “Images” followed by “Convert.” This action will open the standard file open panel, where you can locate and choose the desired disk image file previously saved.
Here are some guides:
Convert macOS Installer File to DMG (.app to .dmg)
Convert macOS Installer to ISO
Convert Bootable ISO File to Virtual Disk VHD/VMDK
You’ll notice a fifth format option called hybrid image (HFS+/ISO/UDF). This format allows multiple formats to be combined into a single image and is commonly used for storing data from various file systems.
If you wish to change the encryption of the open disk image, click the Encryption pop-up menu and select the desired encryption format.
Changing encryption formats may require additional time, mainly if the disk image employs encryption. The existing data must be decrypted before being re-encrypted and saved in the new format.
Once you’ve made the necessary selections, enter a new name for the disk image, click “Save,” and then click “Done” to complete the conversion process.
You can also read: How to Download Specific macOS Versions: Beta, Public or PublicRelease.
Viewing APFS Snapshots
If you’re using the APFS file system on a volume, you can view periodic snapshots created by Apple’s file system at regular intervals. These snapshots serve as a redundancy feature and aid in data recovery in the event of volume corruption.
APFS utilizes snapshots to repair damaged volumes by comparing the corrupted data with previously saved snapshots. Disk Utility allows you to view these snapshots.
To access the snapshot viewer, go to the main menu of Disk Utility and select “View” followed by “Show APFS Snapshots.” Remember that this menu option only works for mounted APFS volumes, not their parent container volumes.
Container volumes are used as metavolumes in APFS, allowing for easy addition, removal, and resizing of mounted volumes. In most cases, container volumes are not visible on the desktop in the Finder.
It’s worth noting that Time Machine also utilizes the snapshot feature to create backups.
Within Disk Utility’s Snapshot Browser, you can perform various actions such as renaming, deleting, and copying snapshots.
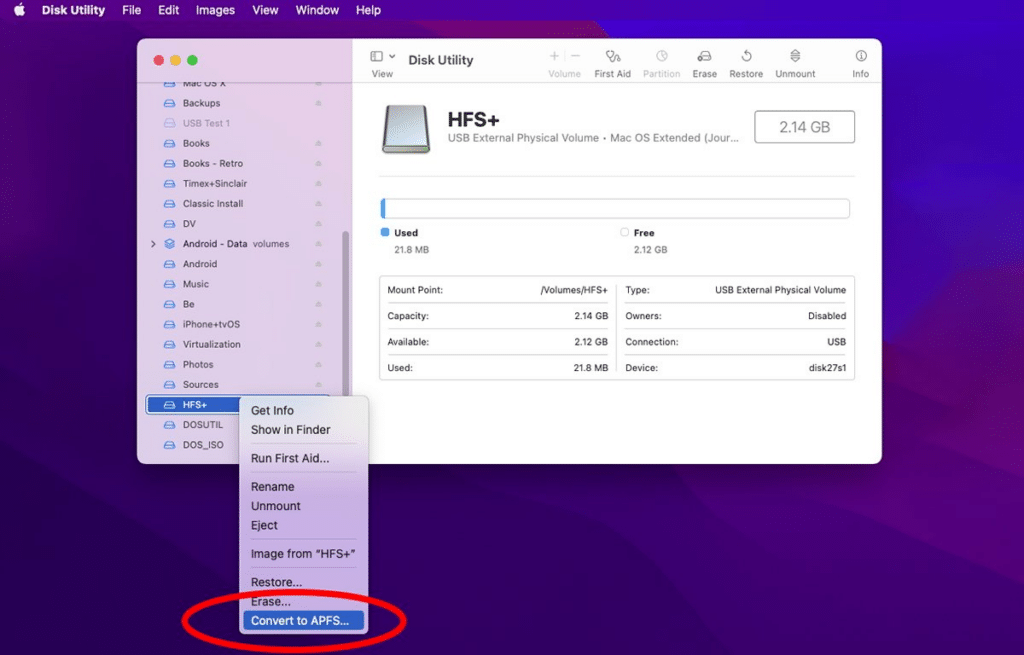
Converting Volumes to APFS
Disk Utility allows you to convert volumes in formats supported by the app, such as HFS+, to APFS volumes. However, it’s essential to approach this task with caution as it carries some risks. If the conversion process fails midway, you may lose all the data on the volume.
Before proceeding with conversion, ensure that you have fully backed up the volume and, preferably, the entire device.
Select the volume in the Disk Utility sidebar to convert an existing HFS+ volume to APFS. From the main menu, choose “Edit” followed by “Convert to APFS,” or right-click on the volume in the sidebar and select “Convert to APFS” from the pop-up menu while holding the Control key.
A confirmation alert will appear, reminding you that APFS volumes are incompatible with older versions of macOS and that the conversion cannot be undone. If you wish to proceed, click “Convert” to initiate the conversion process.
Be patient, as the conversion may take some time. If successful, you will have a new APFS volume instead of the previous HFS+ volume. In case of failure, your data may be lost, requiring you to wipe the volume and copy files from the backup.
Note that for Disk Utility to convert a volume to APFS, it must already be formatted with the GUID partition scheme.
You can also read: How to Format an SSD to APFS Format: Solving “This Disk Doesn’t Use the GUID Partition Table Schema.” Error in Windows.
Enabling Logging
Logging refers to keeping additional copies of file and folder volume information and directories separate from the main file system’s hierarchy. This logging information can be used for data recovery if data loss occurs.
Disk Utility’s First Aid feature utilizes logging information when attempting to repair a damaged volume.
While logging is always enabled on APFS volumes, on macOS Extended (HFS+) volumes, you can choose to enable it when initially erasing a volume. However, if you have volumes not formatted with logging enabled, you can enable it later using Disk Utility.
To enable logging for a volume, select it in the Disk Utility sidebar and navigate to “File” in the main menu. From there, choose “Enable Logging.” Disk Utility will attempt to enable logging for the volume and indicate the result in the displayed results sheet.
Enabling logging incurs minimal performance degradation, usually unnoticeable to the user.
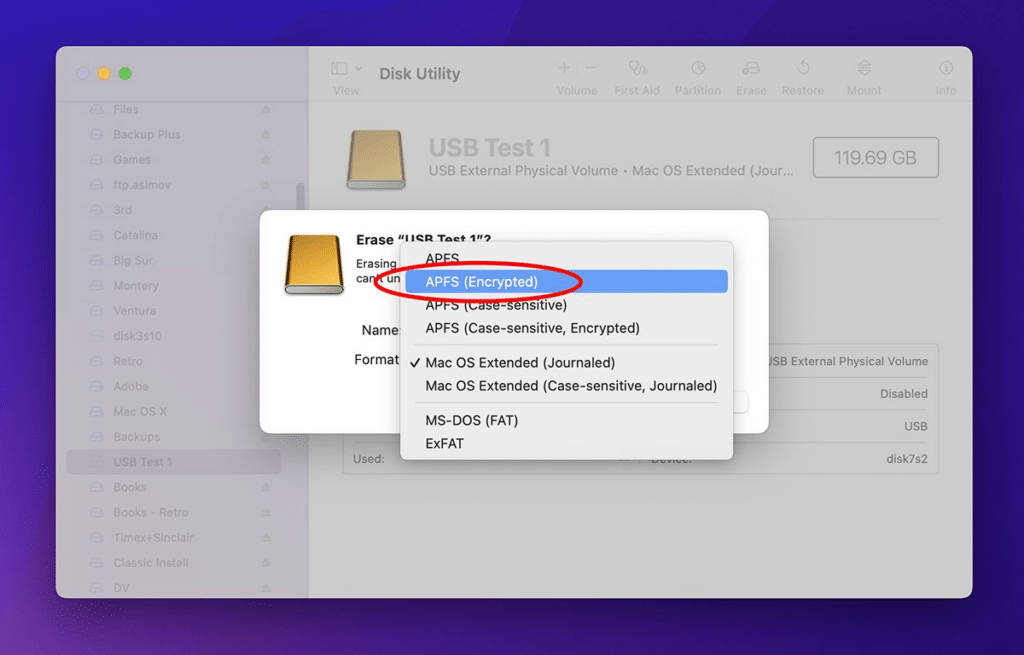
Password Protecting Storage Devices
To add an extra layer of security to a storage device using Disk Utility, you can password-protect it by formatting it as “APFS Encrypted.” This process encrypts the data on the device and prompts for a password whenever the device is connected to your Mac.
For internal devices, entering the password is mandatory during the boot process if the device contains a startup disk. Remember that forgetting an internal device’s password may render your computer unable to boot.
To create an encrypted and password-protected device in Disk Utility, select the device in the sidebar and click the Erase icon in the toolbar. Enter a name for the new volume and choose “APFS (Encrypted)” from the “Format” pop-up menu.
You’ll be prompted to enter a new password on a sheet. After providing the password, click “Choose” and return to the previous sheet. Finally, click “Erase” to initiate the encryption and formatting process.
Disk Utility will erase the device, and a sheet will indicate whether the operation was successful. If you have a password-protected device, you can change its password later by selecting it in the sidebar and choosing “File” followed by “Change Password” from the main menu.
Renaming Volumes and More
Disk Utility offers a range of additional features and functionalities that extend beyond what we covered in this three-part series. In the final installment, we will explore how to create bootable macOS installation discs, repair Apple Fusion hybrid drives, and utilize command-line disk utilities in Terminal.


