


Table of Contents
The macOS Ventura system was released a few months ago. After running and testing it for quite some time, here is the complete review of the macOS Ventura Final version.
macOS Ventura System Requirements
Apple believes that you can install the new system on the following computers:
iMac 2017 and newer.
iMac Pro 2017.
MacBook Air 2018 and newer.
MacBook Pro 2017 and newer.
Mac Pro 2019 and newer.
Mac Studio 2022.
Mac mini 2018 and newer.
I suggest checking if your computer can install this system, as the list for Monterey has been modified slightly from last year. You may have fallen behind already.
How to upgrade to macOS Ventura?
If you have macOS 10.14 Mojave or later, you can update macOS to the latest version through System Preferences – Software Update.

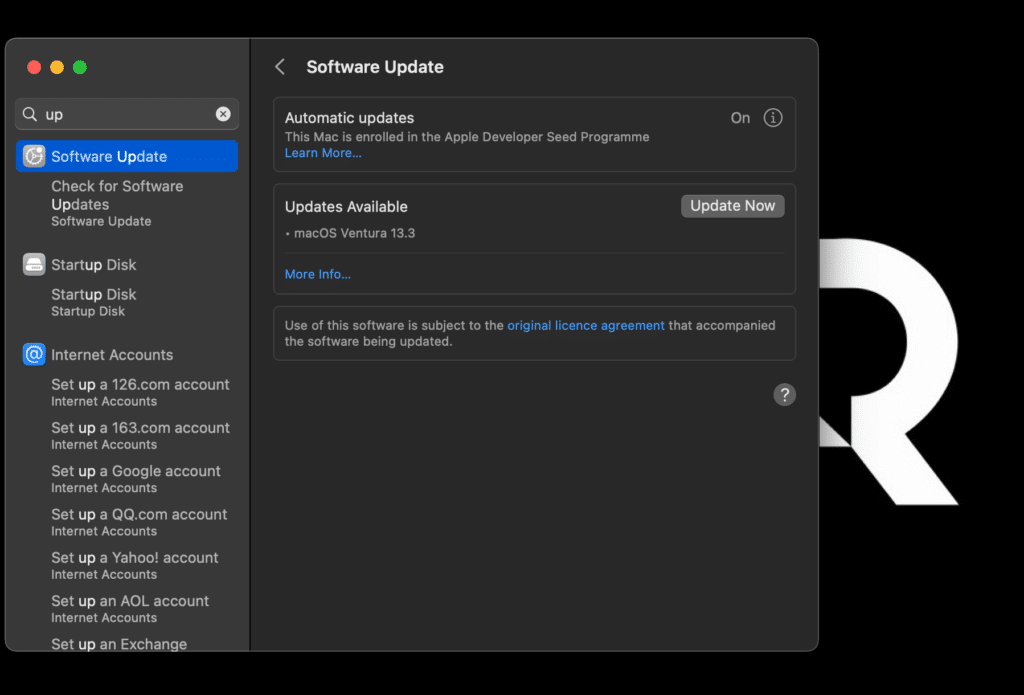
To find macOS Ventura in the Mac AppStore, search for it if you have an older version. Apple now only provides a list of supported computers for the system rather than specifying system requirements such as the processor and memory.
You can alternatively download macOS Ventura DMG File for Clean Installation as well.
New look for System Preferences
The primary changes in the system’s appearance pertain to the system settings, which have been completely redesigned to resemble those on iPadOS or iOS.
Although the new settings may look unusual, the most peculiar aspect is that familiar sections are now quite hidden. For instance, the “Share” item, which used to be in the main section of settings, is now concealed in the “General” section.

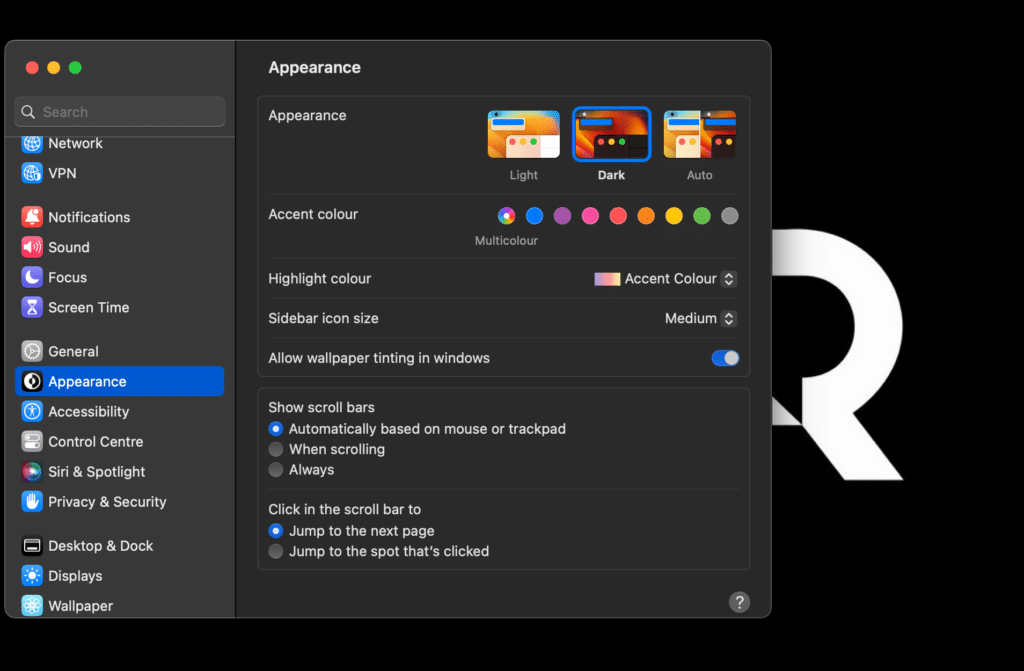
However, most settings remain in their previous locations, albeit with a different appearance. The Search function is now a favored section in settings, allowing you to locate menu items that might be challenging to find otherwise.
Moreover, you can now initiate and cancel individual processes and enable automatic downloads for specific applications. This functionality was previously accessible only through Libraries.
Stage Manager
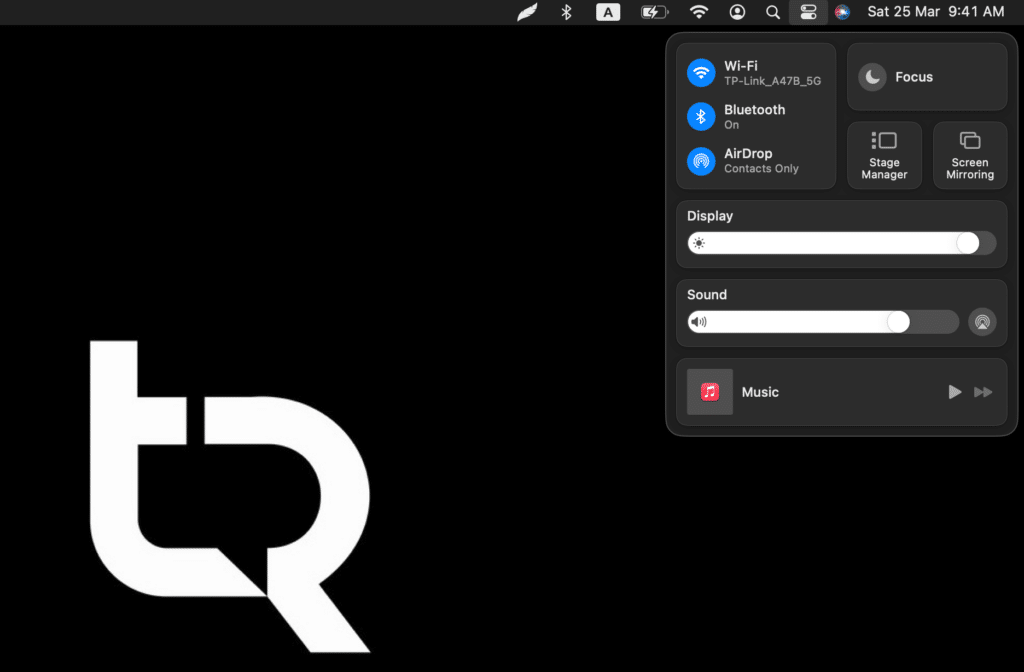
Stage Manager serves as a window management tool. To activate it, access the Menu Control Center and select “Stage Manager.”

By default, Stage Manager hides all desktop objects when activated. Any inactive app or window appears in the sidebar, allowing me to select the desired one with a single click.
Interestingly, the number of stacked items in the sidebar depends on your display’s height. The taller the display, the more things will fit. On my FullHD screen, I can fit up to 5 items.
However, this doesn’t imply that other items are closed; they don’t appear in the sidebar. I can utilize the standard Command+Tab menu or access them via the Dock.

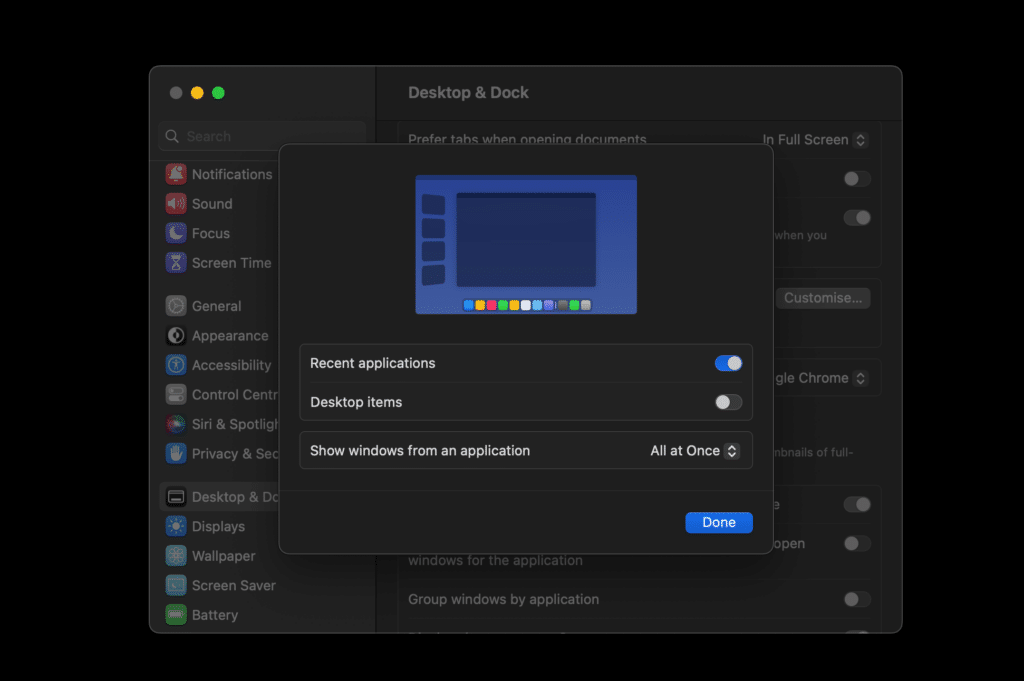
Settings for Stage Manager mode are available in Settings – Desktop and Dock. These include options to turn it on and off, display recently used apps, show all application windows at once or one at a time, and show or hide desktop items.
Secure connection of external accessories
Apple Forced Dialog is a permission feature for connected devices. When a new accessory is connected for the first time, a dialog box requests permission to access the device.
This permission applies not only to data drives but also to USB, Thunderbolt, and other accessories connected to the computer. Theoretically, this feature enhances computer security, but it can be unpleasant.
To turn off this setting, navigate to System Settings, select Privacy, and then toggle off “Allow accessories to be connected.“
Freeform application
The Freeform application, promised to be included in the release but delayed, is now available. It serves as a standard tool for working with interactive whiteboards.
With Freeform, you can add various elements to your interactive whiteboard, including stickers (adjustable color, size, and font), additional objects and shapes, plain text (with adjustable font and color), photos or videos, and files of any format (e.g., music, pdf, txt, video). To scale the interactive whiteboard, use the combination of Command+ and Command-.

You can also invite others with Apple devices to collaborate on the whiteboard. This feature is available on iPadOS as well.
Using the iPhone’s camera and microphone
One of the new features is the ability to share the iPhone camera with your MacBook without using third-party apps. Here’s how it works: when you open any app that uses the camera, the default view is the MacBook’s built-in camera.
You can also read: iPhone as Webcam in macOS Ventura: How does it work?
However, you can select the iPhone camera from the list in the top Camera settings, and it will be used as an external camera instead.
Remember that the Wi-Fi connection will be disrupted if you receive calls or messages. Additionally, you can use your iPhone’s microphones for better sound quality during voice calls by selecting it separately from the camera in System Preferences – Sound. This is particularly useful in situations where the video is not necessary, but only separate audio is needed.
Clock & Weather Apps
Apple’s recurring trend is incorporating certain iOS/iPadOS mobile applications into macOS. This time, two applications have been added to macOS: Clock and Weather.
The Clock app is now available by default on macOS and closely resembles the iPad app. It offers several sections, including World Clock, Alarm, Stopwatch, and Timer.


Additionally, macOS now includes the Weather app, which was unavailable. The app provides essential information on temperature, humidity, and weather forecast, allowing users to add multiple cities to their lists. The Weather app’s design is visually appealing and user-friendly.
Remove background from a photo
Another feature that has made its way into the new macOS is the ability to remove the background from an image quickly. Open the photo in the standard view, navigate to the tools menu, and select “Remove Background.“

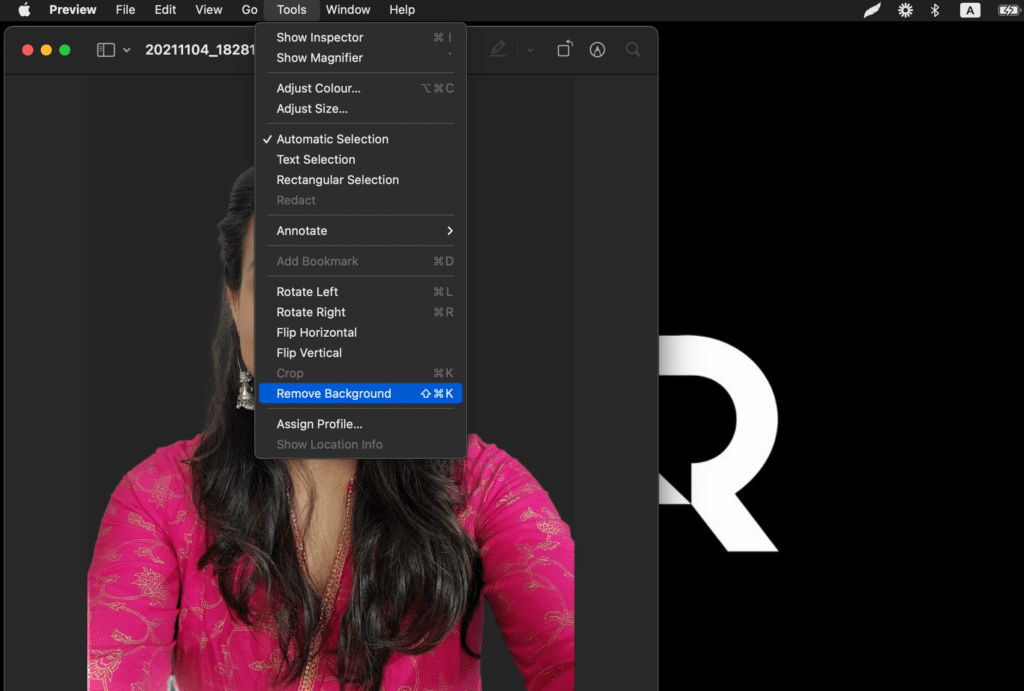
The system will display the image’s appearance once the background has been removed. Afterward, the photo can be converted to a PNG file, resulting in a picture with a transparent background.
New Spotlight features
macOS can now show results for a specific query, such as “snow,” and display related photos. Users can select an image and use the Spacebar button to preview it using Quick Look, which was impossible before.


New Safari features
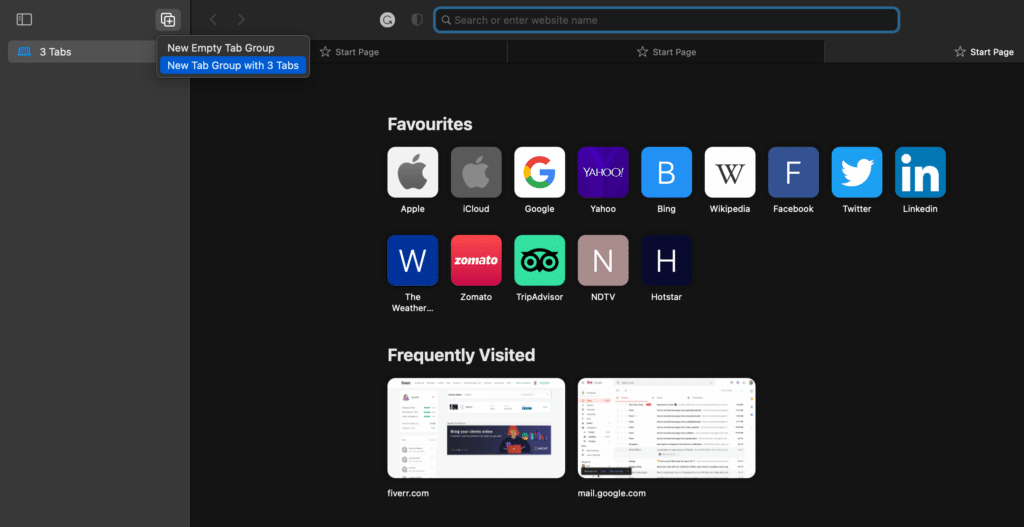
Safari now features tab groups that allow users to organize and save tabs for later use. Users can see the stacked groups of tabs by opening the tab menu on the left. Creating a tab group is easy. If multiple pages are open in your browser, click the plus sign at the top and select “New tab group.” This feature is an improvement over the previous method of adding a folder of tabs, which would pile up in a heap.

These tab groups are also integrated into the system. For instance, when setting up focus, users can select a specific tab group for a particular focus mode. For example, when switching to the Work focus mode, Safari displays a separate list of tabs used for work. A different set of tabs will be displayed when switching to a different focus mode. Additionally, tab groups can be shared with others for collaboration on the same sites.
New Mail features
With the new macOS, you can schedule emails to be sent at a specific time by selecting a standard time or setting a custom date and time.
Additionally, even after sending an email, you have a 30-second window to click “Unsend” in the bottom left corner.

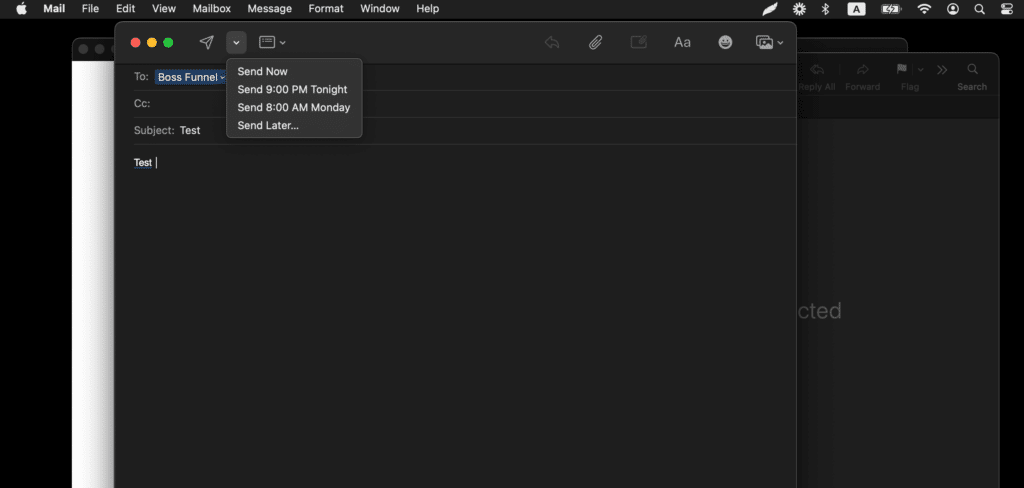
Furthermore, you can set up read reminders for incoming emails to ensure you don’t forget to read them later.
New Messaging Features
The iMessage app now offers standard editing options for messages, allowing users to edit, delete, or cancel the sending of their messages.
With the new feature, users can edit messages that have already been sent. When an edited message is received, the recipient will see all the edits made to the original message. Additionally, users can cancel a message that has already been sent, but only within a certain time frame.
Furthermore, users can cancel the read receipt and mark the message as unread again.
Live Text Selection function
The Live Text Selection feature has been brought over from the mobile platforms. It allows you to select text from an image and paste it into a text editor.
This feature also works with videos. Pause the video and copy the text from the frame, then paste it into the text document.

Please note that this feature only works through standard browsing and QuickTime Player.
New Photo Features
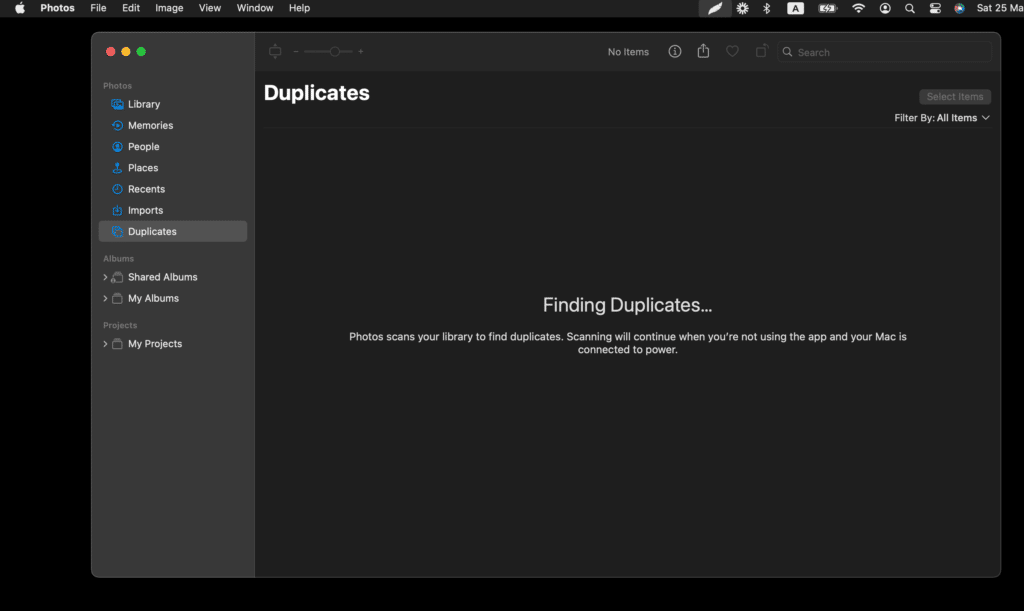
The Photos app now includes a feature for finding and removing duplicate images. A new “Duplicates” section on the left allows identical duplicate images to be easily located and deleted.

Additionally, suppose you apply edits to one image in the editing section, such as corrections. In that case, you can copy the edits (Cmd + Shift + C) and then paste them (Cmd+Shift+V) onto another image. This is a helpful feature for simultaneously making the same edits to a group of images.
New Reminders features
You can pin any task list to the left panel, making it easily accessible even with multiple lists and reminders.
Furthermore, you can save a task list as a template from the File menu. If you accidentally delete a task list, you can create a new list and select the option to create it from a template, which will include the previously saved list.

This feature can be handy if you frequently create the same task list type in the app.
New Font Features
Most users may not frequently use fonts on macOS, but the Ventura update has introduced a helpful feature.

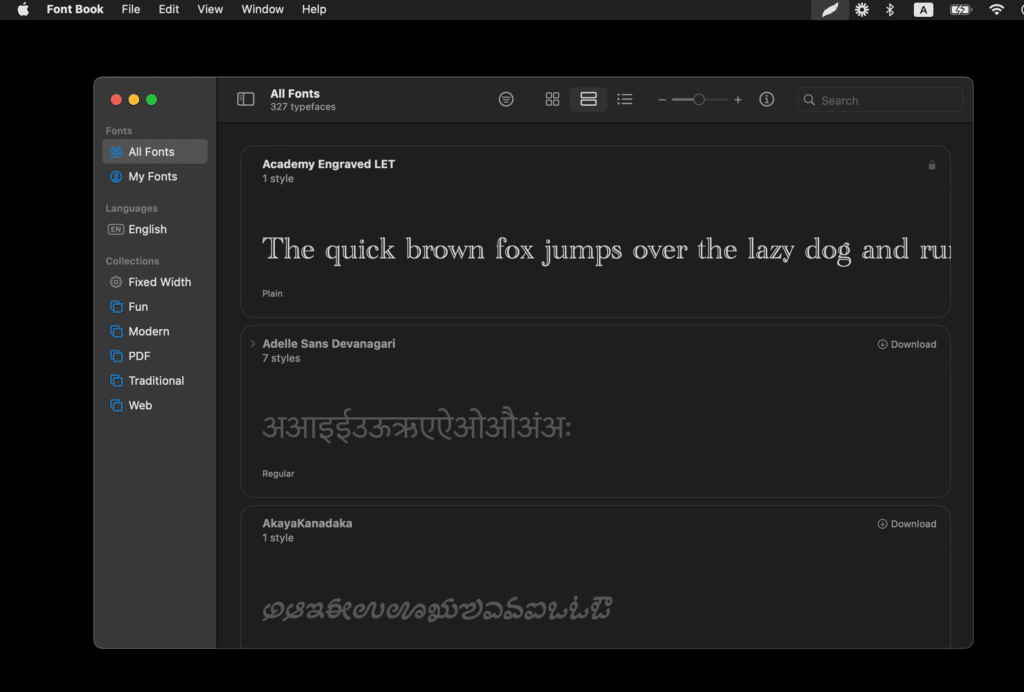
Previously, fonts could only be viewed in a list, requiring users to open them individually to see how they looked. However, a separate view now displays how each font appears at a glance.
Minor Innovations
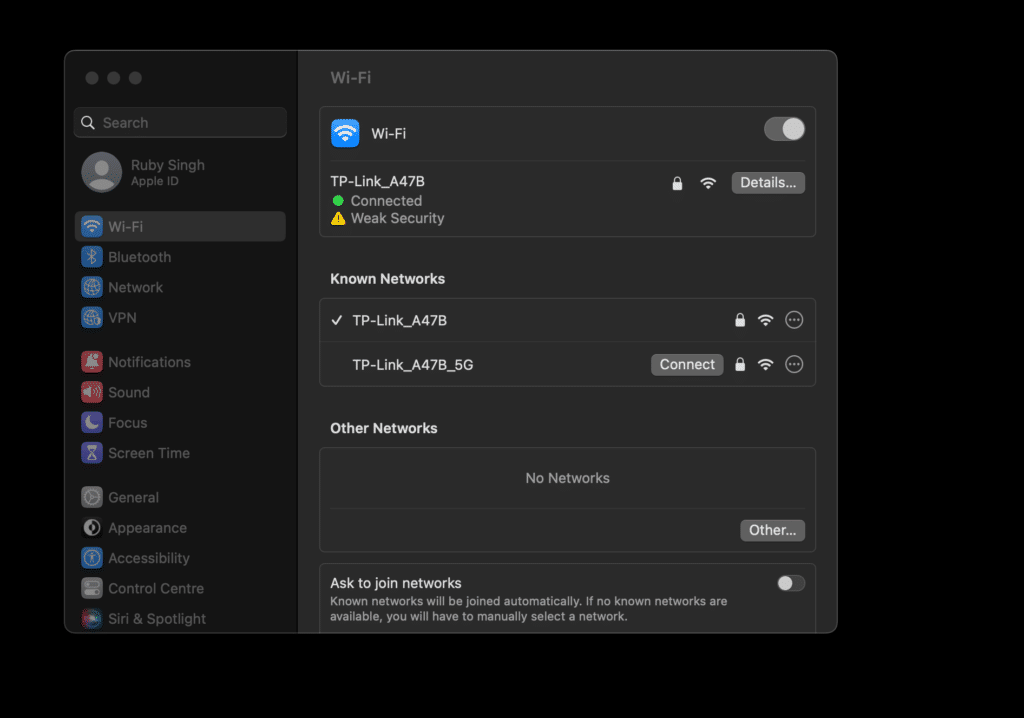
You needed to access your keychain to retrieve the password for your Wi-Fi network in previous macOS versions. However, you can easily find it in the Ventura version in the network settings under the Wi-Fi menu. Select the network you want and copy the password, which will automatically copy to your clipboard.

With Time Machine backups, previous macOS versions only allowed for automatic settings predetermined by Apple. But now, in Ventura, there’s a menu of options where you can configure the frequency of backups. You can choose to have them done every hour, every day, every week, or manually. You can also recover deleted files after macOS Ventura update.
Ventura has made configuring AirPods and game controllers easier in the system settings. Additionally, the system is full of small innovations to improve overall usability.
Apple macOS Ventura Review
The Ventura version of macOS is a significant upgrade that enhances the user experience with its fast, reliable, and elegant interface. It offers several valuable improvements, including features to improve productivity, using your phone as a webcam, making email searches more straightforward, and more.
Positives
- The upgrade is solid and reliable, with a low learning curve.
- The Stage Manager feature helps users focus on the current app.
- Continuity Camera enables users to utilize their phone as a webcam.
Negatives
- The new System Preferences app makes it more difficult to find advanced features.
- When editing a message, older versions of the message remain visible.
- The shared photo library allows family members to delete or edit any photo.
If you want to revert to the the previous version, read this guide: How To Rollback from macOS Ventura Beta to macOS Monterey.