
Table of Contents
Apple unveiled the most recent version of macOS, macOS Ventura, during WWDC 2022. However, some users discover lost data due to the macOS Ventura update. This article offers four useful techniques for recovering lost data on macOS Ventura. Learn about the most recent Mac operating system before taking action on macOS Ventura data recovery.
Your Mac will run quicker and more reliably thanks to the modifications made by macOS Ventura. It will undoubtedly enhance your Mac experience in several ways. The upgrades are pleasing. But with system upgrades, one inevitably encounters a problem, how to recover lost files after macOS Ventura update? If you’re dealing with this or getting ready for when you upgrade, then you’ve come to the right place! We will discuss ways to recover lost files after the macOS Ventura update.
Part 1: Interesting New Features in macOS Ventura
The newest operating system from Apple, macOS Ventura, expands on the success of its forerunners with several brand-new features and enhancements.

- The interface has never been clearer, fresher, or more contemporary with macOS Ventura.
- Numerous new applications and features in macOS Ventura will improve your Mac experience.
- It adds enhancements to already-existing features and applications like the Mail app, the Calendar app, and the Safari web browser.
- Developers may build a shared-with-you feature to allow users to contribute videos and articles to their apps.
Part 2: Why Did the Files Disappear from Mac after macOS Ventura Update?
If the upgrade procedure runs quickly and correctly, the macOS update doesn’t destroy any files stored on the Mac machine. It might be hard to pinpoint the precise cause of files disappearing on Macs after upgrading to Ventura, but here are several potential causes you can consider:
- When upgrading to macOS Ventura, a Mac crashes.
- Unknowingly, files might be inadvertently or accidentally erased.
- Your Mac’s software may not work with the newest operating system.
- Data is overwritten when macOS Ventura cannot be installed due to a lack of space.
- After the macOS upgrade, the location of saved files is altered.
You can do a few things if you’re having this issue. The first thing you may do is determine whether your files have been relocated following the upgrade. If not, go to the next section and attempt the suggestions to retrieve deleted files after the macOS Ventura update.
Part 3: How to Recover Deleted or Lost Files After macOS Ventura Update?
Below are some of the best methods to recover missing files after macOS Ventura update.
Solution 1: Recover Lost/deleted Files after macOS Ventura Update with 4DDiG
There are only a few methods for recovering data after macOS Ventura update on Mac. Most of those methods rely on you having a trustworthy backup. Only a small percentage of us regularly back up our files, though.
We need a solution to permanently recover deleted files that were not backed up for the rest of us. While not simple, the task is not impossible. We’ll enlighten you. A miraculous tool called 4DDiG Mac data recovery will assist you in getting your data back after the Ventura update to macOS. It operates on current algorithms intended to restore all deleted data quickly. The ability to recover 1000+ file types is one of its features.
- Recover lost data from crashed computers, encrypted devices, external storage devices such as SD Card/ USB/External Drives, or local storage, etc.
- A user-friendly interface with a clear layout for maximum usability.
- The 4DDiG app supports both Windows OS and Mac.
- No need to disable SIP when using it on Mac.
- No undetectable malware, pop-ups, ads, or viruses.
- Today’s algorithms make finding lost data simple.
Let’s examine how to use the 4DDiG app to recover missing files after mac update Ventura.
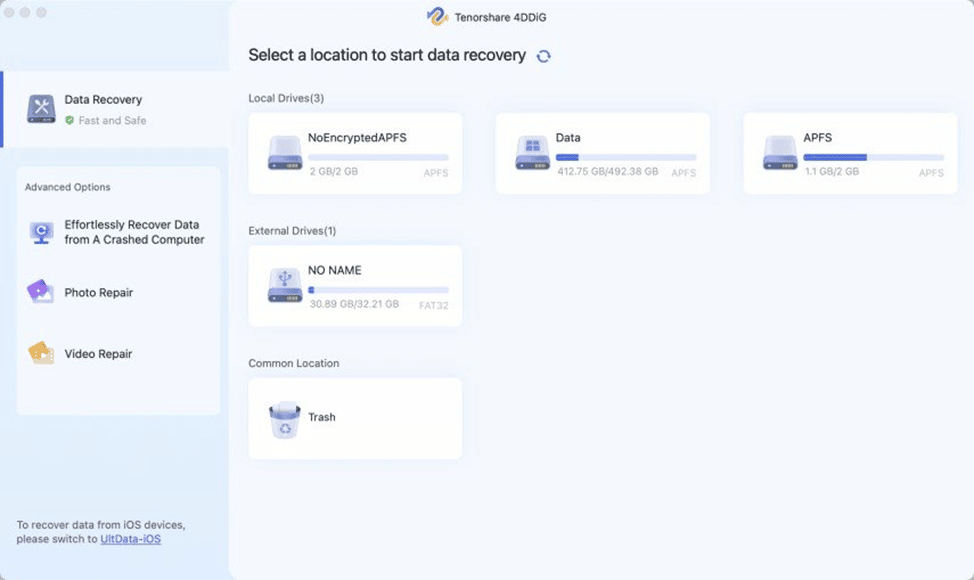
Step 1: When you open the 4DDiG app, all your discs and devices will be listed on the home interface. Click “Scan” after selecting the drive from which you lost the data.
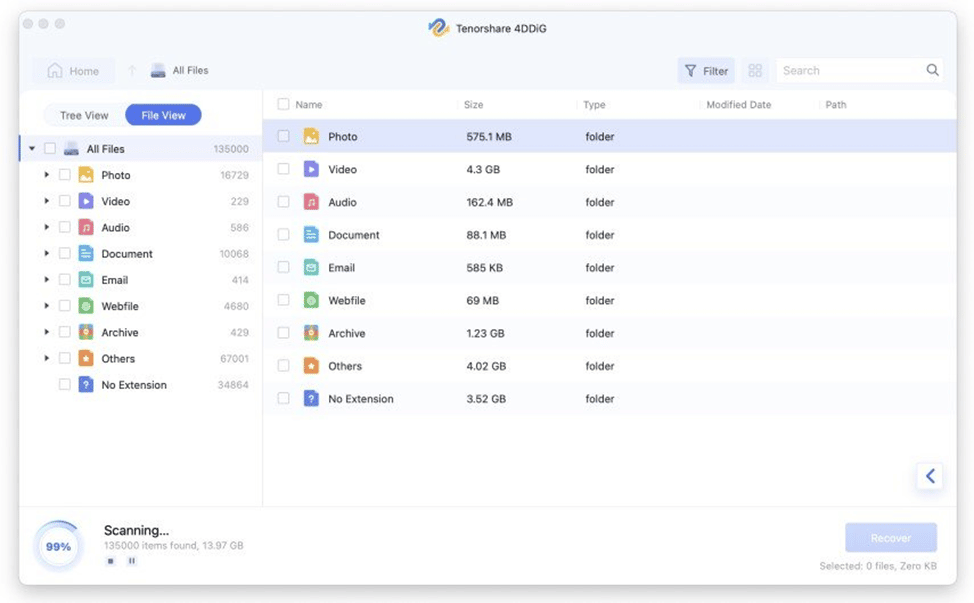
Step 2: The software will begin searching and attempt to locate all deleted files. The discovered files and folders will gradually start to appear on the screen.
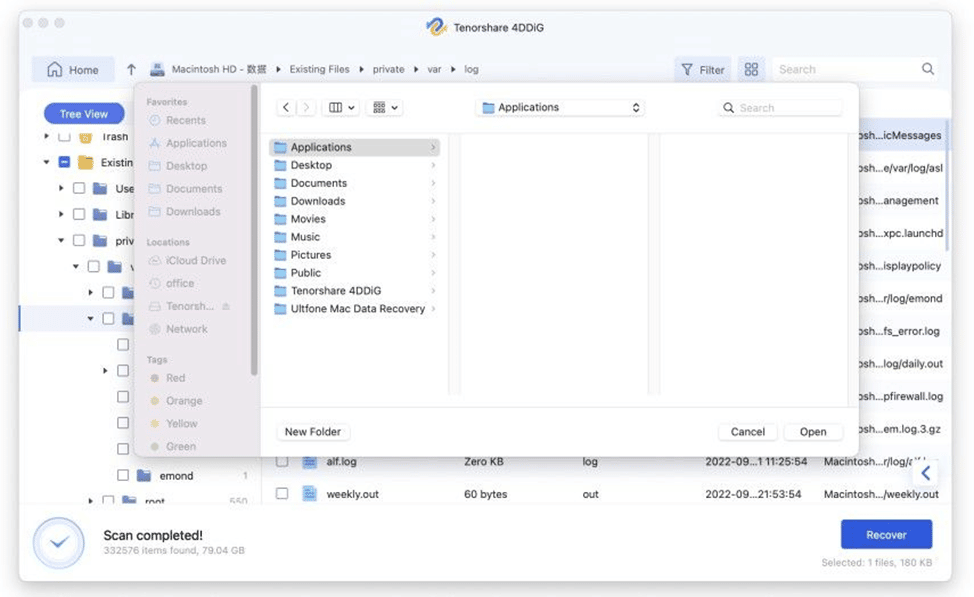
Step 3: You may restore the files to your PC by selecting the recover option when they are located. Click on save after choosing the place where you wish to store the recovered data.
Solution 2: Retrieve Missing Files via iCloud
All Apple devices have an iCloud backup option. Here’s how to use your iCloud backups if you regularly create them to recover any missing files after macOS Ventura upgrade.
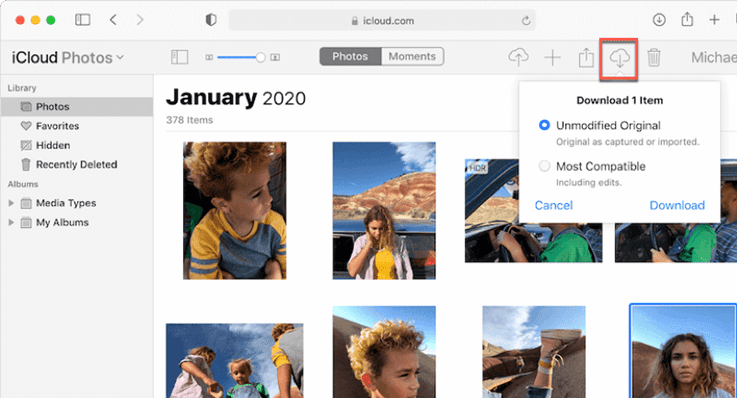
Step 1: The first step is to access the iCloud backup and search for the documents and folders you wish to restore.
Step 2: After discovering the files, download them to your hard drive.
Solution 3: Recover Lost Files from Time Machine
You can use Time Machine to recover accidentally deleted files and folders on macOS Ventura if you’ve been regularly backing up your computer. From a Time Machine backup, deleted data may be restored:
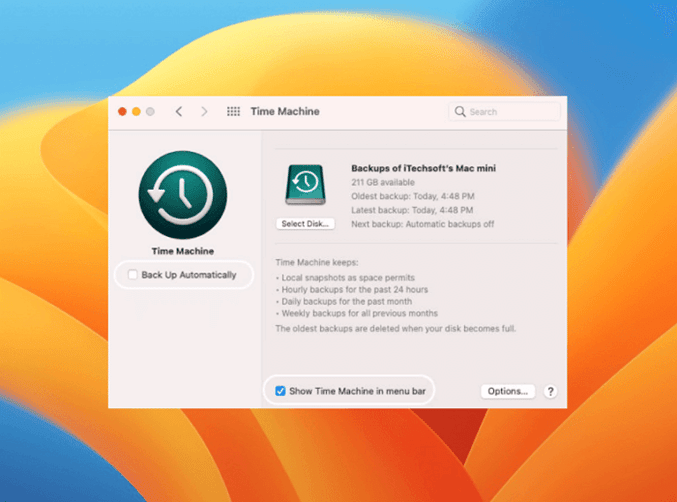
Step 1: Start Time Machine on Mac. (Use Spotlight to search for Time Machine.)
Step 2: Find the precise files you wish to restore. (Pressing the Space Bar will allow you to preview it.)
Step 3: Select “Restore” to return the deleted file to its original place.
Solution 4: Get Files Back Using Apple Support Centre

If all else fails, your greatest option for recovering misplaced data following a macOS Ventura update is Apple Support. When nothing else works, you may get assistance from Apple. On its website, Apple offers customer service. You may submit a ticket describing your problem, and they will take care of the rest.
You may use the comprehensive knowledge base on the online Apple Support website to find solutions to your problems.
FAQs
Below are some of the frequently asked questions about recovering missing files after upgrading to macOS Ventura.
How do I recover files after updating my Mac?
The following methods may be used to retrieve data after the Ventura update on Mac OS.
- Utilizing a recovery tool like 4DDiG data recovery.
- Retrieve lost files through the trash bin.
- Recover Missing Files iCloud Backup for local backups.
- Using tools like Time Machine.
Can you recover lost files on a Mac?
You can recover lost files on Mac using any of the methods mentioned above.
How do I recover files and folders on a Mac?
By accessing file history or by using recovery tools such as the 4DDiG data recovery, you could recover accidentally deleted files.
How can I recover data after a software update?
There are different methods to recover data after software updates. However, using Tenorshare 4DDiG is the best and safest option.
Conclusion
Although it’s crucial to keep the computer updated, occasionally, things might go wrong, and you can find yourself wiping your data. You need a tutorial to assist you and specialized data recovery software such as Tenorshare 4DDiG. So, read this article and get started with it.
4DDiG Christmas & New Year Sales Coming!( Dec 9, 2022 – Jan 4, 2023)

Get Benefits from these Amazing offers at 4DDiG Christmas & New Year Sales. Congratulations you just happened to come across the “4DDiG Christmas & New Year Sales” campaign, let’s take a quick look and grab this great deal to make recovering your deleted/lost files after the macOS Ventura update even easier!
100% Win A Gift
Click “Start”,users will see “Choose A Sock, 100% Win a Prize”.
Each user can get 4 chances to 100% win a prize by picking a sock at random. To participate it, you can:
a. Sumbit your email to get 1 chance, after submitting, you can pick a sock at random.
b. Share this page on Facebook or Twitter, you will get 2 extra chances to win prize.
c. By subscribing to our YouTube channel, you can also get a chance to win a prize.
Up to 70% OFF On Best Single Deals
- 4DDiG Data Recovery (60% OFF)
- 4DDiG File Repair (60% OFF)
- 4DDiG Duplicate File Deleter (70% OFF)
- Windows Boot Genius (70% OFF)
XMAS Coupon Code – 40% OFF
Please click here to learn more about the campaign:
https://4ddig.tenorshare.com/special-offers.html
Hope you’ll find it helpful! Happy Shopping!


