Table of Contents
Since iOS 11, the format in which iPhone, iPad, and iPod Touch store photos is HEIC. Apple decided to abandon the JPG and adopt this new format to achieve significant savings in the space occupied by photos and at the same time achieve a greater depth of colors in shots taken from iOS devices.
This supposes quite essential advantages, but at the same time, it has some disadvantages. The format is not compatible with Windows and many applications to view or manage images, in addition to versions before iOS 11 or macOS High Sierra in the case of Apple products.
Therefore, in the following article, I want to show you several methods to convert HEIC to JPG in a simple, fast way and with the least possible quality loss.
A small introduction
But before going into the matter and seeing the different methods to pass the photos in HEIC format to JPG, I would like to talk about each format, especially the advantages and disadvantages of each one.
What is a HEIC file?
HEIC stands for High-Efficiency Image Coding. These types of files generated with each of the photos shot from an iOS device store several files in HEIF format(High-Efficiency Image File Format, which we could translate as High-Efficiency Image File Format).
Precisely, the iPhone, iPad, and iPod Touch store in these contents one or more image files (depending on whether or not the Live Photos function is active and also the audio file also captured by the process mentioned above).
The main advantages of the HEIF format are that they occupy approximately half of the storage space and at the same time offer a series of features that are not available in JPG files, such as transparencies, the possibility of including several images, or the color density of 16 bits (compared to 8 bits in the case of JPG) among others.
Undoubtedly a series of significant advantages, especially if you are fond of photography and want to achieve the best possible results with your smartphone.
What is a JPG file?
JPG or JPEG is a format that needs virtually no introduction. It is the most widely used format in image compression and has been considered the market standard for many years.
Thanks to being a “standard,” it is compatible with almost any device, so if you want to send an image file to a person and make sure that you will not have problems viewing it is an excellent option to choose.
When creating a JPG file to store an image, it is possible to choose the degree of compression. The higher the compression, the more loss of image quality and the smaller the final file size.
Convert HEIC Files to JPG on Mac
As you can see, the main disadvantage of the HEIC format compared to jpg is compatibility. Therefore, iOS devices take advantage of all their advantages and only convert the photos to JPG when attaching them in an email or sending them to a service that is not compatible and thus achieve that the receiver does not have problems opening them.
In case you sometimes need to transform a HEIC file to JPG on your Mac for any use, in the following lines, you can find several methods with which you can do it quickly and easily.
You can also read: How to Convert WebP to JPG or PNG: 3 Easy Ways
Method 1: Export with Preview
All Macs include several applications to convert HEIC files to JPEG (or other formats such as PNG). One of them is the underrated Preview.
This application that a priori looks like a simple view of many different files has many more functions than it seems and enters them is the possibility of exporting a HEIC file to other formats, among which is the JPG.
To achieve this, you only have to do the following:
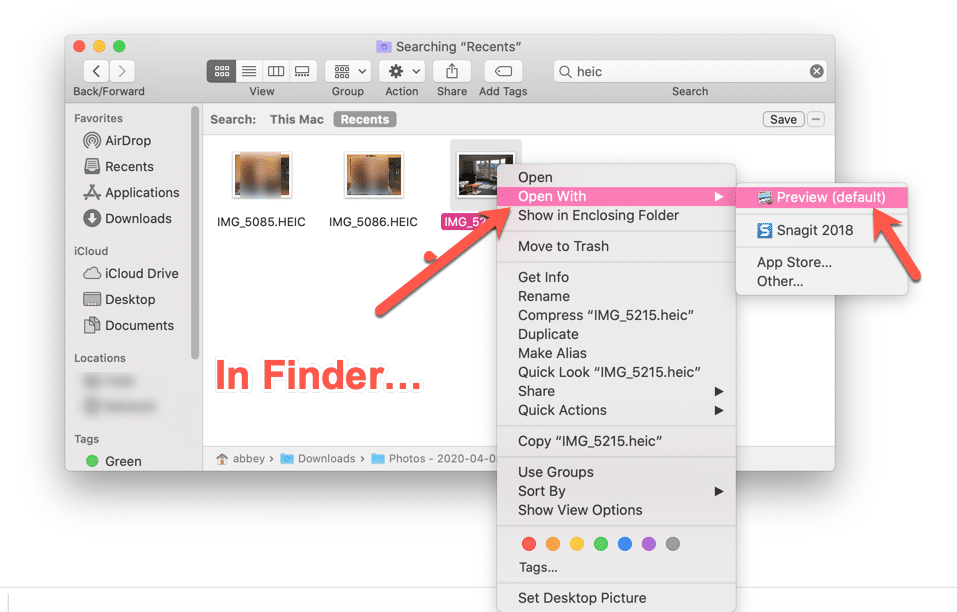
- Opens a HEIC image in Preview.
- Click on File in the top menu and choose the Export option.
- In the window that unfolds, be sure to choose JPEG from the Format drop-down.
- Type the name of the final file, select the folder in which you want to save it and finally click on Save.
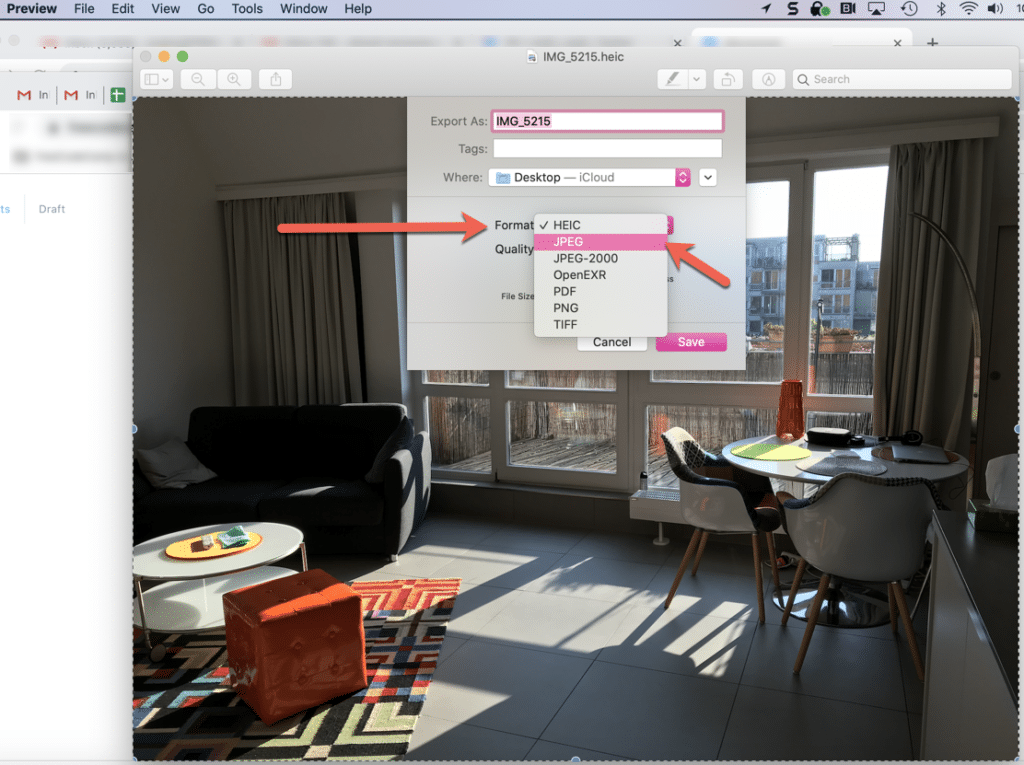
In this simple way, you will get a JPG file with the previously in HEIC format image. Also, if you open multiple image files in the same Preview window, you can export them all to JPG in a single step.
Method 2: Export with Photos
Another application included in all Macs and that also allows you to convert HEIC to JPG is Photos. This method is incredibly convenient if you need to transform photos from your iOS device from HEIC to JPG and keep them synchronized through iCloud. Of course, you can also add to the Photo Library any HEIC file you have on your computer and then convert it.

- Open Photos and select the photo or photos you want to change format (if the photo is not inside the Photo Library, you will have to drag it previously to the window and then select it).
- Now you have two options: click on the selection and drag it to the Desktop or any other folder or click on File – Export – Export XX photos.
- With the first option of the previous point the JPG files will be created automatically in the indicated path. In case you have opted for the second option, you will have to select the parameters you want (JPEG quality, size, color profile, etc, etc …), click on the Export button and finally select the folder in which you want to save the files.

With both one option and the other, you will find a JPG file with the photo or image when you finish the export. Of course, as I mentioned at the beginning of this article, the final files will take up more space than the original HEIC file, and the color depth will be limited to 8 bits.
Method 3: With third-party software
If you need to convert files from one format to another regularly, you may be short of native Mac tools. In this case, you may need to resort to third-party software such as iMazing HEIC Converter.
This software is tremendously simple to use, and with very few clicks, you can convert many images from HEIC to JPG in bulk.
Once you download the software from the link above and install it on your Mac, you need to do the following:
- Run the application and drag to its window all the images you want to convert. It can be one or hundreds.
- Choose the output format between JPEG and PNG.
- Leave the Keep EXIF data box checked if you want the EXIF information of the image to be kept (information such as the camera model with which the photo has been taken, geographical location, author of the shot, etc, etc …) or uncheck it if you do not want to keep it.
- Choose the compression level.
- Click on Convert and finally in the new window that you will see appear select the folder in which you want the resulting files to be saved.
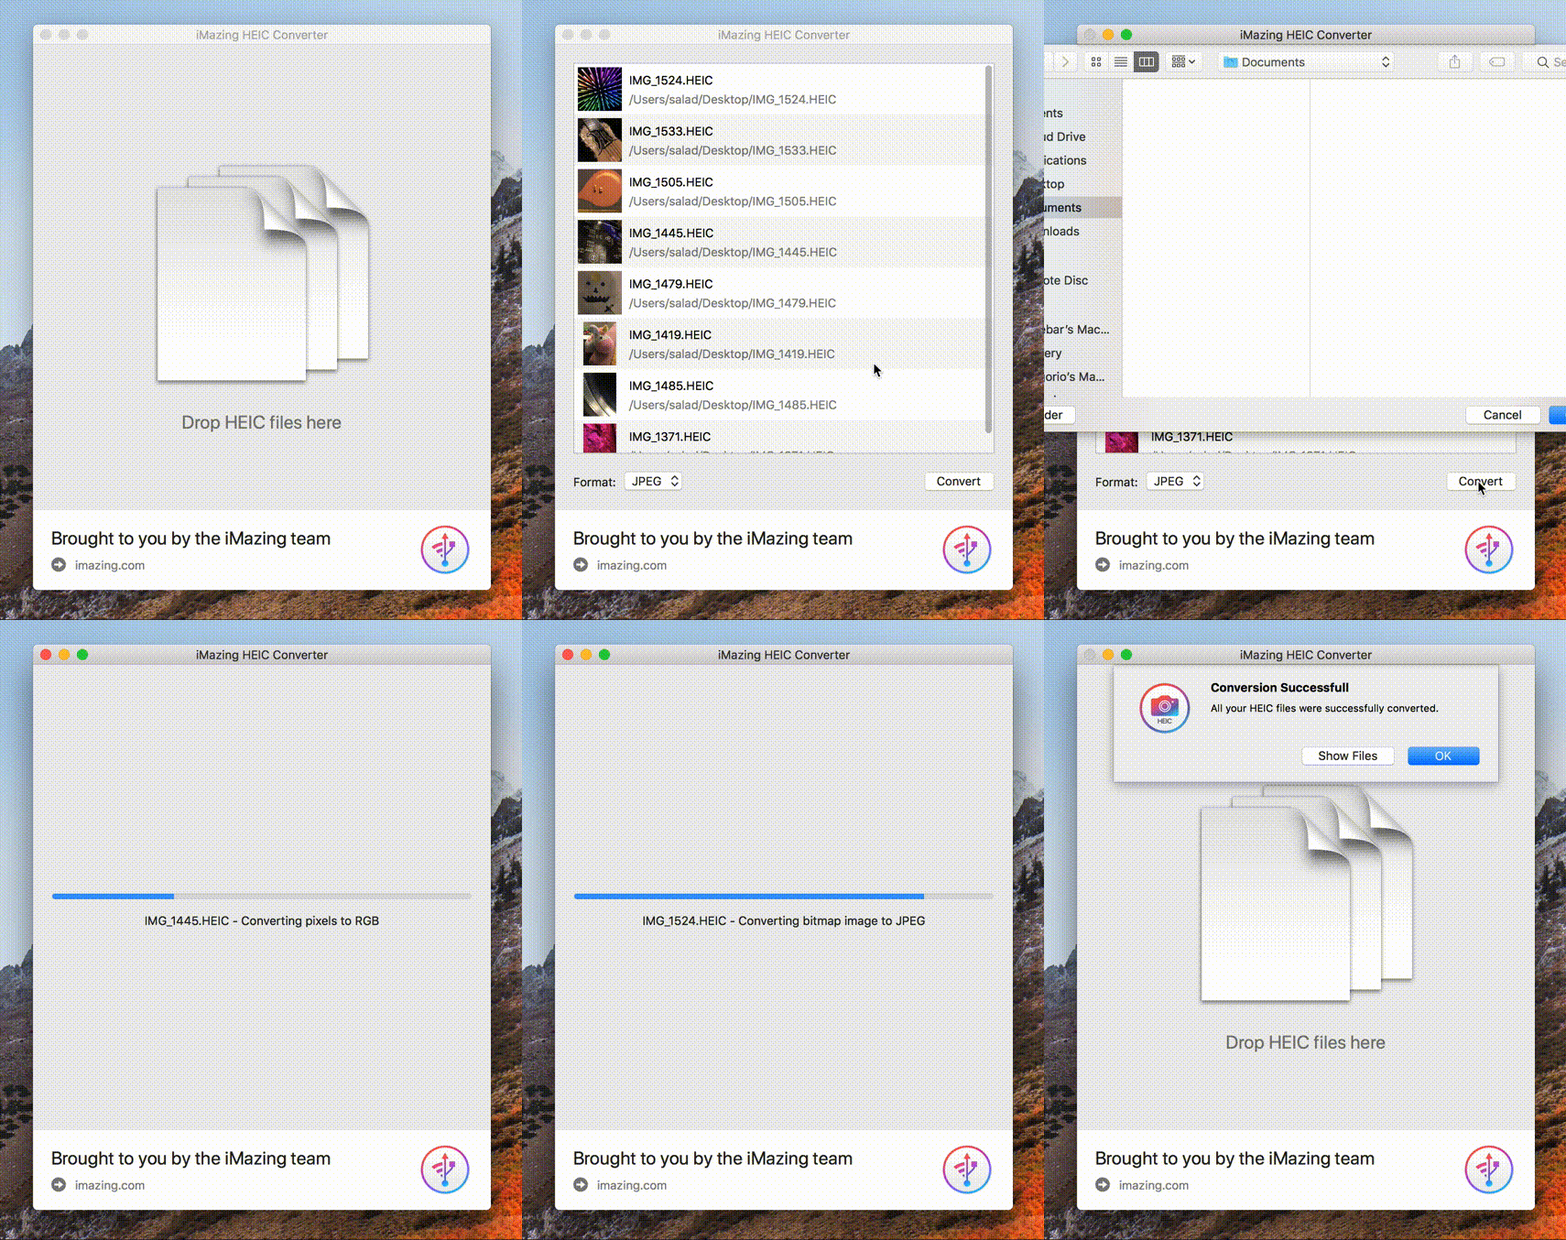
As you can see, a straightforward, fast method that allows you to handle tens, hundreds, or even thousands of conversions from HEIC to JPEG with very few clicks. In addition, it is essential to mention that the program is entirely free and has been developed by the iMazing team, a software that we do not hesitate to include in our list of the best apps for Mac.
Another very powerful third-party application
The above tool is limited to converting between the formats mentioned above. Still, if you need something more powerful and that you can also use to, for example, convert between different video formats, Permute may be the tool you are looking for.
In this case, it is a payment tool. If you need to convert image, video, or audio files regularly, it is a highly recommended tool with a very tight price. In addition, if you are a Setapp subscriber, you can also access it with the service’s monthly fee.
Once installed on your Mac, open it and follow these steps to convert HEIC images to a more standard format:

- Drag the HEIC files to the application window.
- Select the output format at the top left of the application window.
- Click on the Play button that you will see in the lower left corner of the screen, just at the end of the list of files to be converted.
And that’s it. Automatically the software will get to work and leave you the files already converted to JPG or the chosen format in the same folder in which the original HEIC are.
Method 4: Online converter
If you have an older Mac that does not support HEIC, that is, that has an operating system before macOS 10.13 High Sierra, or you are using another type of computer, an online converter can be an excellent alternative.
In the market, many websites allow you to transform images from one format to another in a simple way, and in the case of HEIC, this also happens. One of the most recognized is Online Convert, which allows you to convert between many image formats, video, ebooks, etc …
To use your HEIC to JPG converter, you must do the following:
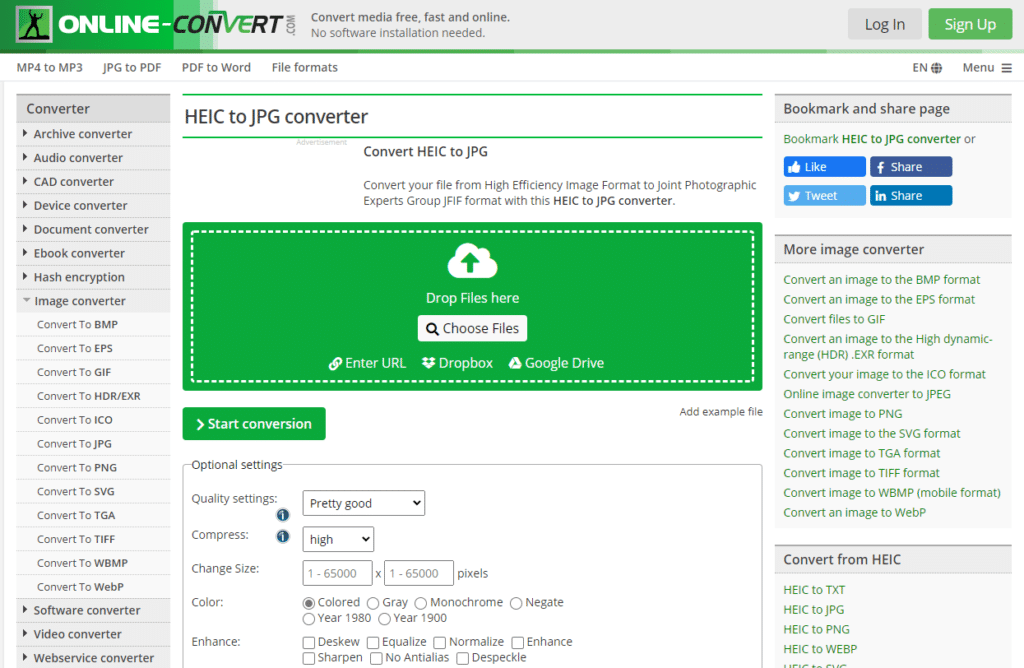
- Access the converter from your web browser by clicking on this link.
- Drag the files you want to convert to the green box or click on Select files and indicate in the new window which files you want to convert.
- Select the settings you want to apply to the final images. You can select a new resolution, regulate the compression level, apply improvements to the image, etc, etc …
- Finally, click on Start Conversion and wait for the process to finish. Once completed, the file will be automatically downloaded to your computer.
The waiting time of this online service will depend on the number of photos you upload, the number of requests you are attending at any given time, etc… Despite this, as a general rule, the process is fast. The tests I have been doing have not taken more than 10-12 seconds for each file uploaded.
Now you know how to go from HEIC to JPEG and other image formats
So far, our guide with different options to convert HEIC files to a more standard format. As you have seen, there are many options to achieve this, and you only need to learn to use the one that best suits your needs.
It is expected that HEIC will continue to expand and gradually become a more used format. Everything will depend on whether other systems decide to offer native compatibility and whether it wins against WebP, its main competitor in new-generation image formats.


